Table of Contents
1 | Introduction to Design Tokens
2 | Managing and Exporting Design Tokens With Style Dictionary
3 | Exporting Design Tokens From Figma With Style Dictionary
4 | Consuming Design Tokens From Style Dictionary Across Platform-Specific Applications
5 | Generating Design Token Theme Shades With Style Dictionary
6 | Documenting Design Tokens With Docusaurus
7 | Integrating Design Tokens With Tailwind
8 | Transferring High Fidelity From a Design File to Style Dictionary
9 | Scoring Design Tokens Adoption With OCLIF and PostCSS
10 | Bootstrap UI Components With Design Tokens And Headless UI
11 | Linting Design Tokens With Stylelint
12 | Stitching Styles to a Headless UI Using Design Tokens and Twind
What You're Getting Into
In the previous article from this series, we did a deep-dive into what Style Dictionary is and how we can use it to manage our design tokens and export them as platform deliverables.
In this article, we’ll launch into using Style Dictionary as we would on a professional team. Specifically, the designer to developer handoff.
We’ll imagine that we are developers working on a product called “ZapShoes,” an e-commerce application that promises to ship their shoes faster than all of their competition.
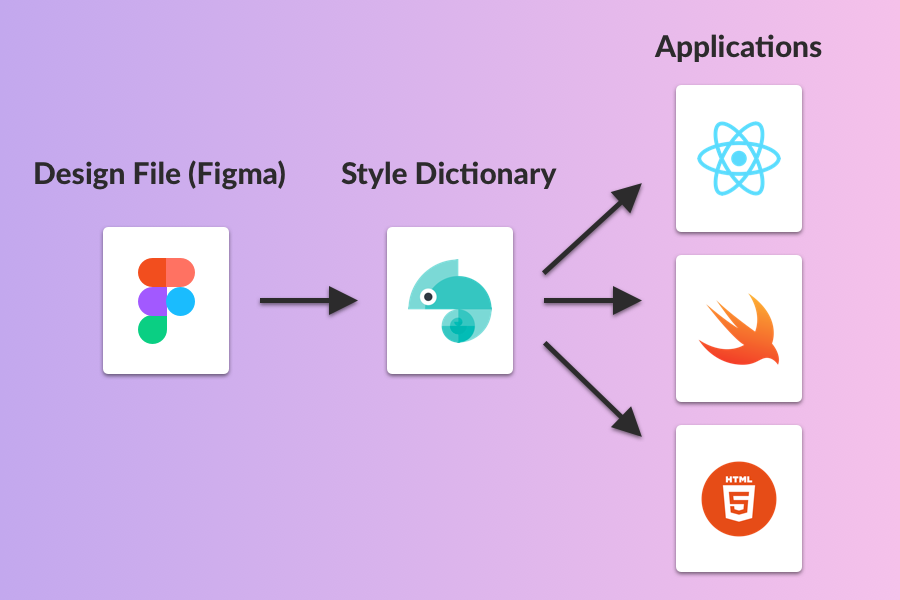
The design team has created a design file using Figma that contains the design specifications for UI components. We’ve been tasked with finding a way to take that design file and generate design tokens represented by JSON following the Category/Item/Type structure.
Additionally, we’ll need to get those generated design tokens into our style dictionary.
Finally, we need to execute the transformation of our tokens in the style dictionary to export the design tokens as platform deliverables that can be consumed by all of our applications at ZapShoes.
Here’s a visual representation of our goal:
How can we solve this problem?
The Proposed Solution
In this article, we’ll solve one part of the problem.
We’ll generate JSON representations of our design tokens from the original design file using a Figma plugin.
We’ll also look at two ways to import those design tokens into Style Dictionary. First, we’ll accomplish this by having the Figma plugin output to a directory in a local GitHub repository. Second, we’ll send the generated design tokens to a serverless function instead of a local GitHub repository.
In both the local GitHub repository and the server, we’ll use the Style Dictionary CLI to transform, or export, our JSON design tokens into platform deliverables such as CSS and JS.
The final piece of the puzzle is getting the transformed/exported Style Dictionary deliverables into the hands of the applications that will consume them. This part of the problem I’ll also reserve for a future article as we’ll need to discuss all the possibilities and their pros/cons.
Generating JSON Representations of Our Design Tokens From a Design File
Let’s begin with solving the first part of our problem, generating JSON representations of our design tokens from a design file.
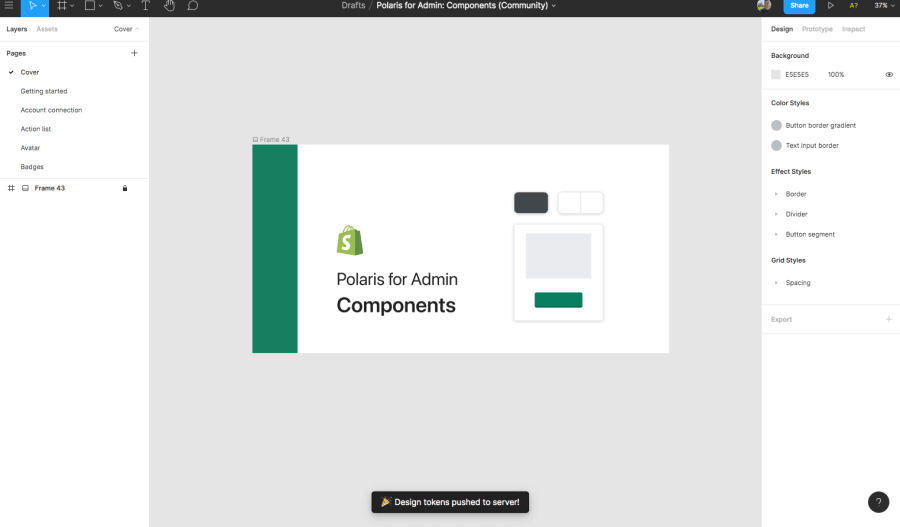
To make things easier, we’ll fork/duplicate the Figma file for Shopify’s Polaris design system.
We’ll use this in place of the imaginary design file from “ZapShoes.”

One quick note before we get going. You can skip over this if you’re in a rush.
I am primarily a developer and not a designer, and I’m not knowledgeable enough to form an opinion on whether Figma is preferable over Sketch. I decided to use Figma as it was easier to fork Shopify’s Figma file than make one from scratch. We’ll also be able to use a cool Figma plugin to auto-generate our design tokens. There is similar tooling for Sketch but I won’t do a tutorial for both. My hunch is that if you learn the process of generating design tokens with Figma, you can pick it up with Sketch by referencing the accompanying plugin documentation. Figma also provides the option to import a Sketch file, if you want to go that route.
Generating Design Tokens Using a Figma Plugin
With the Polaris file that we’ve duplicated in Figma, we can utilize a plugin that will take our design file and generate design tokens in the format recommended by Style Dictionary (the Category/Item/Type format).
Sweet! 🎉
Let’s start by opening up the documentation for that plugin.
It says, "Design Tokens plugin for Figma allows you to export design tokens into a JSON format that can be used with the Amazon Style Dictionary package."
Sounds like just what we need.
Understanding the Plugin Usage
The plugin usage documentation says that we can take our generated design tokens and import them to Style Dictionary by exporting a file or sending the result to a URL, such as a serverless function.
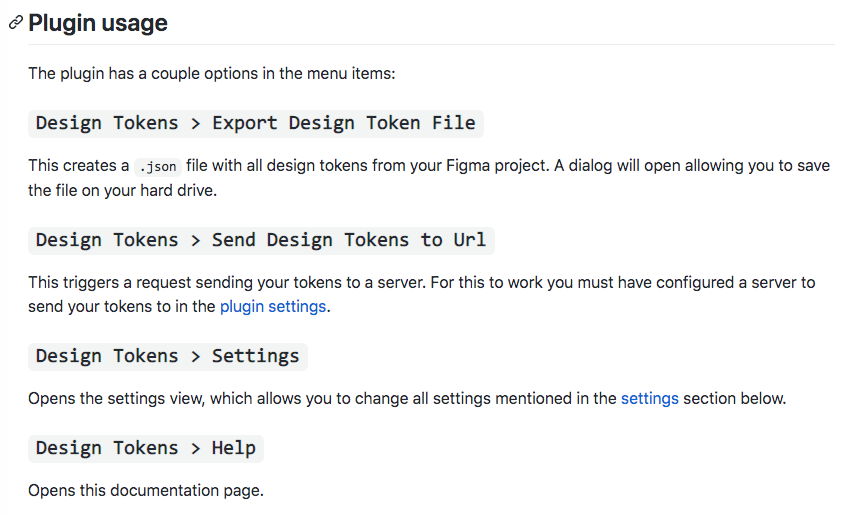
Once we get the generated design tokens into Style Dictionary, whether via a file or a serverless function, we’ll use our style dictionary to export the platform deliverables.
There are a few things to unpack in that statement.
Where is Our Style Dictionary?
First off, I’ve been mentioning a lot about getting design tokens into Style Dictionary. Not getting into the technical details has helped grasp the concept, but it’s time to clarify what exactly we mean by “our style dictionary” (technically speaking).
Style Dictionary is a CLI tool. It has a build command that exports the platform deliverables to an output folder:
style-dictionary build
If it has an output folder, it needs an input folder with the files that it will transform/export.
For this reason, I like to think of it as an intermediate “transformer” layer.
There is a step before generating the JSON design tokens, and there is a step after to get the exported platform deliverables to the consuming applications.
So, where does the Style Dictionary CLI, and its input and output folders, live?
One option is that we create a GitHub repository containing the JSON output of the Figma plugin.
Each application for “ZapShoes” could then grab the JSON output and create a script that uses the Style Dictionary CLI to output the platform deliverables.
The advantage of this approach is that each team has full control to specify which platform deliverables they need and where they should be outputted.
The downside is that while you have a single source of truth for the design tokens (the shared GitHub repository), you don’t have a single source of truth to see what platform deliverables are being generated. Additionally, it adds a burden for each team that owns an application to manage the implementation of Style Dictionary.
Another option is that we have a shared GitHub repository that is also an NPM package. This package would contain an input folder with all the generated design tokens, an output folder with the platform deliverables, and a script that performs the transformation using the Style Dictionary CLI that would be specified as a dependency.
This second option centralizes where the “style dictionary” lives and invites transparency. It does mean that we’ll have to find a way to deliver the platform deliverables to the consuming applications, a problem that we’ll have to solve later.
For now, we just need to know that our style dictionary will be an NPM package with a GitHub repository.
How Can the Plugin Get the Design Tokens to Style Dictionary?
If our style dictionary lives in a shared package, how can we get the design tokens generated by the Figma plugin to this package?
Here is where the plugin usage outlined in the graphic I posted above becomes relevant.
If we chose the first option, exporting a design token file, we can have the plugin export to a clone of the repository for our style dictionary package. If we do this, we would have to do an additional step to push the updated input directory to the repository origin.
This is an easier approach. It may be just fine for a side project/personal application or even a small team. And hey, manually checking the changes to the local repository before pushing to the origin may be a fine way of checking the plugin did what we expected it to.
Choosing the second option, sending the design tokens to a URL, expands the possibilities. For the sake of time (and because I plan to write about this in a future article), let me just highlight one example.
We could create a serverless function, a REST endpoint, that would receive a payload with the updated tokens. It could use the GitHub API to update the origin repository AND send out a Slack notification to let teams know of the change.
Again, that’s just one example!
Super cool! 🎉
The second approach is what I’ll be going with for future article ideas. For now, we’ll carry on to do both approaches in this tutorial for learning purposes.
Exporting Design Tokens From Figma to a Local GitHub Repository
Let’s try out the first option by using the Figma plugin to generate design tokens and export them into an input directory of a local GitHub repository.
To start off, you can clone my style-dictionary repository:
git clone https://github.com/michaelmang/style-dictionary.git
The repository contains an input folder where we’ll store the design tokens that we export from the Figma file.
Let’s export those design tokens next.
Following the Design Tokens plugin documentation, we’ll first install the Design Tokens from the plugin page.

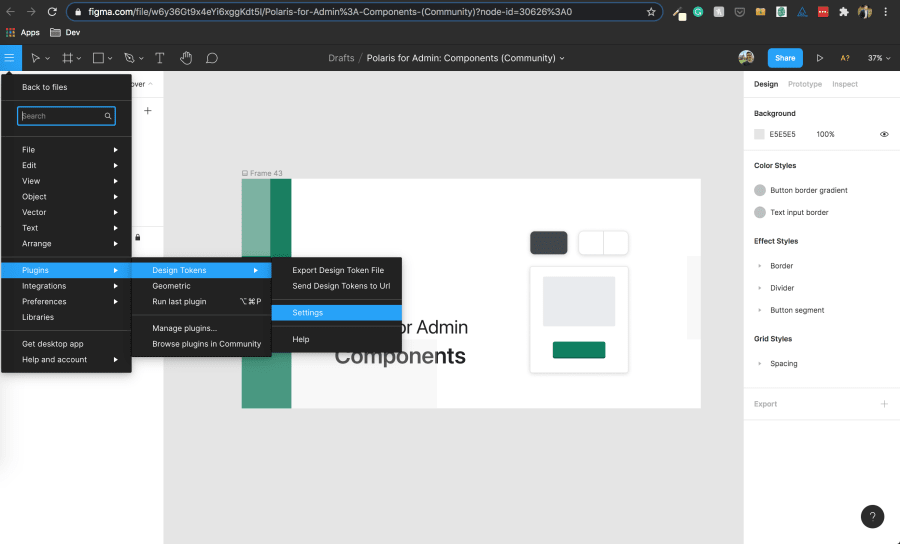
Next, go back to the Figma file that you duplicated earlier and from the menu go to Plugins --> Design Tokens --> Export Design Token File.
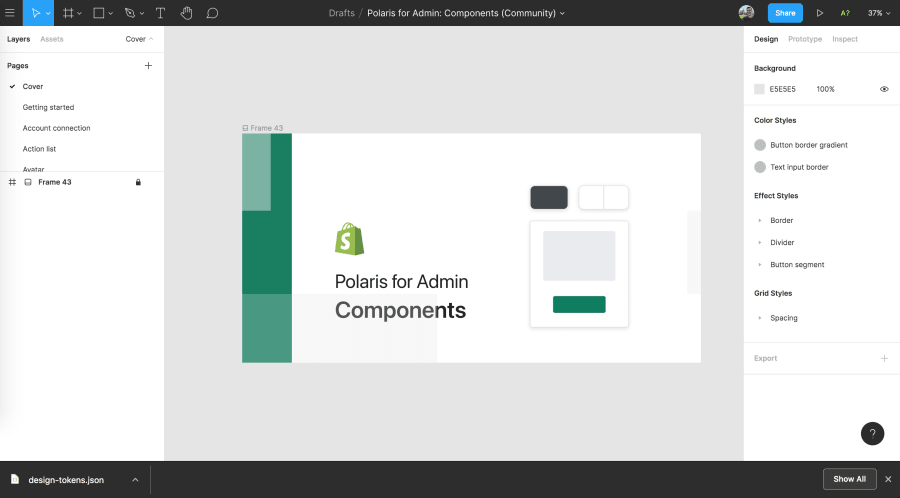
You should see that it downloaded a design-tokens.json file.
Move this to the input folder of the style-dictionary repository:
mv Downloads/design-tokens.json style-dictionary/input
Let’s take a look at the file:
cd style-dictionary
code .
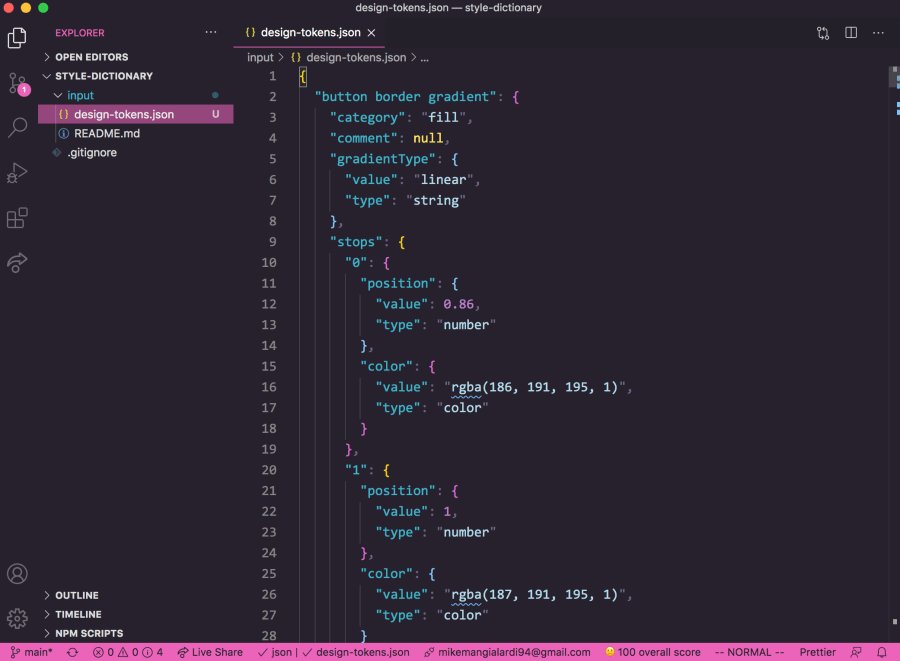
Upon first glance, this looks a bit harder to follow than the Style Dictionary documentation on structuring the JSON.
I’ll be curious to see how Style Dictionary handles this and what platform deliverables it can produce.
The final step for this method would be to commit the changes to the GitHub origin.
However, let’s stop there and I’ll show y’all how to send the design tokens to a serverless function that will also commit the changes to the GitHub origin.
Exporting Design Tokens From Figma to a GitHub Repository Via a Serverless Function
If you’re not familiar with the concept of serverless function, all it means in our case is that we’ll have code for a REST endpoint on a third-party service.
A REST endpoint is essentially a function that will receive some data and do something with it. We’ll still write “server-side” code but someone else is managing the actual server, hence “serverless function.”
The third-party service that I’ll be using is Glitch.
First, I’m going to create a new project using the hello-express template:

As the app template indicates, I’ll be creating our REST endpoint using Express.
Feel free to remove any boilerplate. I remove the public and views folders as well as all the comments in server.js.
After we’re done, we’ll be able to export our code to GitHub so you can go ahead and update the README.md and project name to your liking. Or, you can wait until we wrap up our code.
Back in server.js, let’s remove everything except the express import and initialization as well as the listener that is serving our application:
// server.js
const express = require("express");
const app = express();

const listener = app.listen(process.env.PORT, () => {
  console.log("Your app is listening on port " + listener.address().port);
});
Also, we can expose a REST endpoint called /commit-tokens. Here is where we will call the GitHub API to commit the design tokens we receive.
The Design Tokens plugin for Figma specifies that it will send a POST request with a payload when you select the Send Design Tokens to Url export option. Because of that, we’ll create an Express route that handles a POST request:
// server.js
const express = require("express");
const app = express();

+ app.use((req, res, next) => {
+  res.setHeader("Access-Control-Allow-Origin", "*");
+  next();
+ });

+ app.post("/commit-tokens", () => {
+
+ });

const listener = app.listen(process.env.PORT, () => {
  console.log("Your app is listening on port " + listener.address().port);
});
I also added the Access-Control-Allow-Origin header with a value of * as the plugin documentation specifies.
Next, we’ll need to add the @octokit/core.js package as a dependency in the package.json:
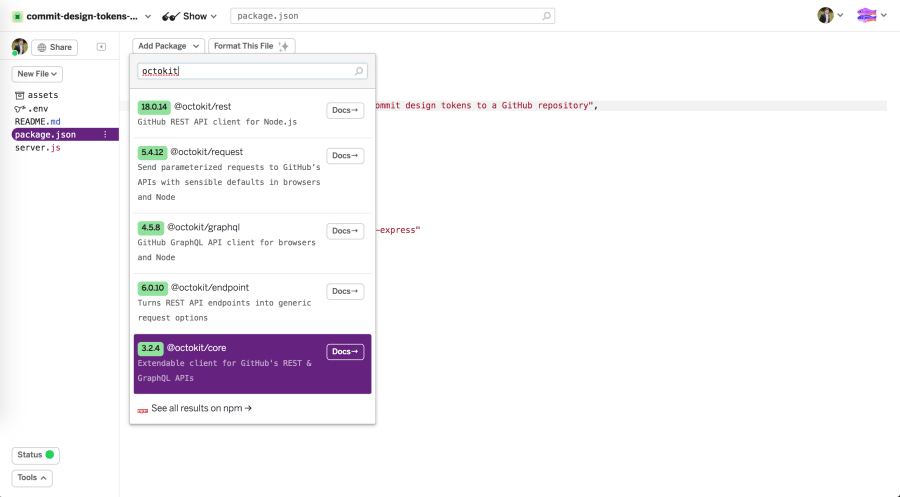
We’ll also add body-parser for parsing the request body:
 "dependencies": {
   "express": "^4.17.1",
+  "@octokit/core": "^3.2.4",
+  "body-parser": "^1.19.0"
 },
It’s not clear from the plugin documentation but after looking at the source code, it looks like the request body from the Figma request is a plain text string (text/plain charset=utf-8).
So, we’ll use body-parser specifically to parse the plain text data from the request body and expose it under req.body.
Back in server.js, we can use this package to send a request to GitHub API to commit the design tokens received by our new route (Note: the request body is dummy data for now):
+ const { Octokit } = require("@octokit/core");

const express = require("express");
const app = express();

app.use((req, res, next) => {
  res.setHeader("Access-Control-Allow-Origin", "*");
  next();
});

+ const bodyParser = require('body-parser');
+ app.use(bodyParser);
+ const bodyParser = require('body-parser');
+ app.use(bodyParser.urlencoded({
+   extended: true
+ }));
+ app.use(bodyParser.text()); // the content type is plain text

+ const octokit = new Octokit({ auth: `personal-access-token123` });

app.post("/commit-tokens", async () => {
+  await octokit.request('PUT /repos/{owner}/{repo}/contents/{path}', {
+    owner: 'octocat',
+    repo: 'hello-world',
+    path: 'path',
+    message: 'message',
+    content: 'content'
+  })
});

const listener = app.listen(process.env.PORT, () => {
  console.log("Your app is listening on port " + listener.address().port);
});
Instead of the dummy personal-access-token123, we’ll have to generate our personal access token on GitHub.
We can add the personal access token to the .env file which will expose an environment variable.
I called my variable GITHUB_PERSONAL_ACCESS_TOKEN.

Now in server.js, we can update the personal access token in the Octokit initialization to process.env.GITHUB_PERSONAL_ACCESS_TOKEN:
- const octokit = new Octokit({ auth: `personal-access-token123` });
+ const octokit = new Octokit({ auth: process.env.GITHUB_PERSONAL_ACCESS_TOKEN });
Additionally, we can update the ocktokit request body with our repository details (Note: this will be different for your fork of the repository):
app.post("/commit-tokens", async () => {
  await octokit.request('PUT /repos/{owner}/{repo}/contents/{path}', {
+    owner: 'michaelmang',
+    repo: 'style-dictionary',
+    path: 'input/design-tokens.json',
+    message: 'Update design tokens',
    content: 'content'
  })
});
The final piece of the puzzle will be to update the content property with the design tokens from Figma.
According to the Design Tokens plugin, we can expect the following request body:
// https://github.com/lukasoppermann/design-tokens#push-to-server
"event_type": "update-tokens", // or any string you defined
"client_payload": {
  "tokenFileName": "design-tokens.json", // this is the filename you define above
  "tokens": "{...}", // the stringified json object holding all your desing tokens
  "filename": "Design Tokens" // the Figma file name from which the tokens were exported
}
Therefore, we’ll pass the req argument in our commit-tokens function and read this payload from req.body to supply the content property (Note: we have to do some extra work so that we parse the JSON string from the request and transform it into Base64 string):
// server.js
+ const body = JSON.parse(req.body);
+ const buffer = Buffer.from(body.client_payload.tokens);
+ const content = buffer.toString('base64');

+ app.post("/commit-tokens", async (req) => {
  await octokit.request('PUT /repos/{owner}/{repo}/contents/{path}', {
    owner: 'michaelmang',
    repo: 'style-dictionary',
    path: 'input/design-tokens.json',
    message: 'Update design tokens',
+   content,
  })
});
One tricky thing is that the GitHub documentation says that a sha property is required when updating a file’s content. The sha is a hash of a git file.
To make this work for both creating the initial file and updating it, we’ll first have to do an additional request to see if the design-tokens.json file exists.
If it does, we’ll provide the sha. If not, then we’ll let it auto-generate one:
// server.js
app.post("/commit-tokens", async (req, res) => {
+  let file;

+  try {
+    file = await octokit.request("GET /repos/{owner}/{repo}/contents/{path}", {
+      owner: "michaelmang",
+      repo: "style-dictionary",
+      path: "input/design-tokens.json",
+    });
+  }
+  catch (ex) {
+    // swallow 404
+  }

  const buffer = Buffer.from(req.body.client_payload.tokens);
  const content = buffer.toString('base64');

  await octokit.request("PUT /repos/{owner}/{repo}/contents/{path}", {
    owner: "michaelmang",
    repo: "style-dictionary",
    path: "input/design-tokens.json",
    message: "Update design tokens",
    content,
+    sha: file && file.data && file.data.sha ? file.data.sha : null
  });
});
Since the file may or may not exist, we’ll have to swallow the 404. If I had more time, I would make this more resilient but we’ll carry on.
We could do some error handling by making sure the event_type in the payload is event_type (among other things), but I’ll pass on that for the sake of time.
However, we should send back a success response after the request to GitHub:
// server.js
app.post("/commit-tokens", async (req, res) => {
  await octokit.request('PUT /repos/{owner}/{repo}/contents/{path}', {
    owner: 'michaelmang',
    repo: 'style-dictionary',
    path: `input/design-tokens.json`,
    message: 'Update design tokens',
    content,
    sha: sha.get("design-tokens.json", null, () => {})
  })

+  res.sendStatus(200);
});
Cool! We’re ready to test this out. 🎉
Before we go, let’s grab the serverless function URL. It’ll be the Live Site link from the Share prompt…

…plus the name of our route/function: /commit-tokens.
For me, given that I named the project commit-design-tokens-github, the URL is:
https://commit-design-tokens-github.glitch.me/commit-tokens
You may also take the time to export this project to GitHub if you wish (Note: you’ll need to create a non-empty GitHub repository to export to first). Here is my Glitch project as a reference.
Let’s head back to the Figma file and instead of exporting the design file, we’ll send the tokens to our URL.
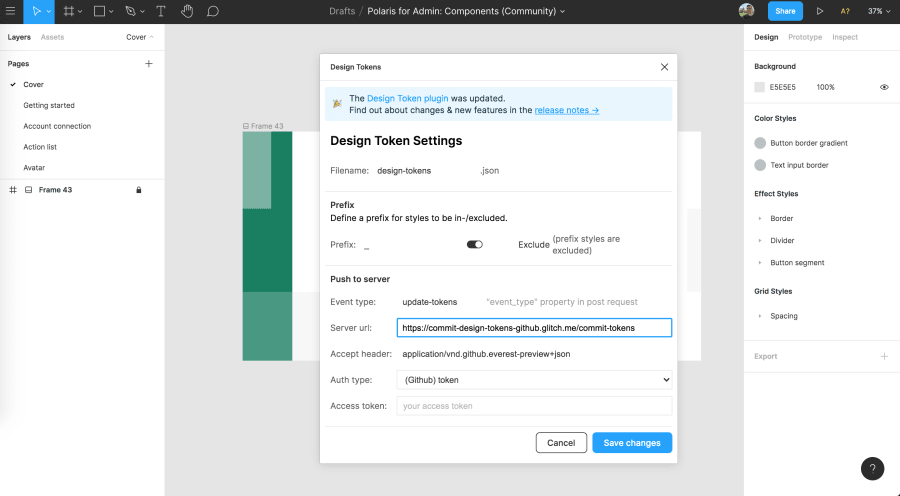
Open the plugin settings and add the serverless function URL:
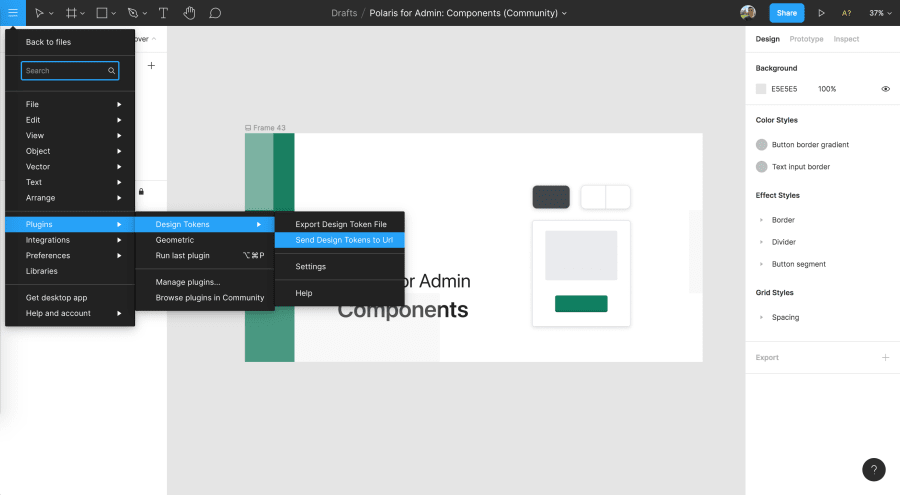
Finally, we can go back to the Figma menu and send our tokens to the URL we just specified:
If it works as expected, we’ll see a message that the design tokens have been successfully sent:
Sweet! Let’s check our GitHub repository to make sure it worked:

Woohoo! 🎉
Here’s my repository with the imported design tokens: https://github.com/michaelmang/style-dictionary
Now, we’re ready to automate the process of transforming the updated design tokens to platform deliverables with Style Dictionary.
Exporting of Platform Delieveriables With Style Dictionary
Specifically, we want to run the Style Dictionary CLI to transform the design tokens and export them to platform deliverables whenever the input folder in the style-dictionary repository receives a fresh design-tokens.json file.
To achieve this, we’ll use GitHub Actions which can kick off a workflow when a file updates, such as our design-tokens.json file.
Before we begin, you’ll want to reset your style-dictionary repository and pull in the latest commit with the design-tokens.json file.
Generating Platform Deliverables
First things first, let’s configure Style Dictionary in the repository.
We begin by installing the Style Dictionary CLI:
npm i style-dictionary
Style Dictionary exposes an init command that automatically looks for any design tokens in JSON files and transforms them into platform deliverables:
npx style-dictionary init basic

We can see that it specifies different platform deliverables, scss, android, and ios.
The deliverables are the name of the files, such as _variables.scss, and are within a build directory followed by the name of a transform group such as scss.
So build/scss/_variables.scss is the output path for the scss deliverables. Looking at the file, we’ll see that it contains scss variables that could be consumed in a web application:
// Do not edit directly
// Generated on Sat, 30 Jan 2021 21:59:23 GMT

$color-base-gray-light: #cccccc;
$color-base-gray-medium: #999999;
$color-base-gray-dark: #111111;
$color-base-red: #ff0000;
$color-base-green: #00ff00;
$color-font-base: #ff0000;
$color-font-secondary: #00ff00;
$color-font-tertiary: #cccccc;
$size-font-small: 0.75rem; // the small size of the font
$size-font-medium: 1rem; // the medium size of the font
$size-font-large: 2rem; // the large size of the font
$size-font-base: 1rem; // the base size of the fon
It also leaves a note that this should not be edited directly as they were generated by the Syle Dictionary CLI.
It may appear like magic but the config.json that was initialized contains some important clues as to how all of this works.
You read the official documentation for Style Dictionary’s configuration, but I’ll highlight some important details.
The "source": ["properties/**/*.json"] line specifies a source property that is set to an array of globs. If you’re not familiar with globs, the **/* part is just some syntactical sugar that will recursively find all files with the subsequent extension, .json.
This line is saying that it will grab all JSON files within a parent properties folder. Style Dictionary will do a deep-merge of all the discovered JSON files into a single JSON object before transforming the design tokens into a platform deliverable.
This means that you can separate your design tokens into separate files such as color.json or font.json and the final deliverables would look the same as if you just had one design-tokens.json file. This doesn’t pertain to us as our plugin always creates a single design-tokens.json file but know that it is possible to organize things at the style dictionary level.
Our design-tokens.json file was in an input directory so how come we ended up with a deliverable like _variables.scss if we don’t have a properties folder that was being sourced?
If you check your code editor, you’ll see that Style Dictionary generated a sample properties folder with some sample JSON files representing various types of design tokens:

Back to the config.json file, we can see that there is another platforms property. This is an object with nested “platform group” objects such as this one:
"scss": {
  "transformGroup": "scss",
  "buildPath": "build/scss/",
  "files": [{
    "destination": "_variables.scss",
    "format": "scss/variables"
  }]
},
scss is the platform group object containing properties that specify the transform group, the output folder for the platform deliverables, and the list of files that should be transformed, along with their “format.”
Style Dictionary has predefined formats that allow you to specify how you want the platform deliverable to be formatted.
For example, you can use scss/map-flat as a Sass map (the Sass version of an object):
$tokens:  (
  'color-background-base': #f0f0f0;
  'color-background-alt': #eeeeee;
)
All of this to say, if you want to create a new platform deliverable, you will have to update the config.json file.
For every new application that wants to consume the design tokens but expects a platform deliverable that has not been configured, a platform group object would have to be added.
Now that we know how config.json is set up to generate our platform deliverables, let’s update it so that it will generate scss and css variables from our design-tokens.json file that we got from Figma.
First, we can delete the properties and build folders and make the input folder our source:
- "source": ["properties/**/*.json"],
+ "source": ["input/**/*.json"],
Next, I’ll update the platform transform groups so that scss and css variables will be generated in an ouput folder:
"platforms": {
  "scss": {
    "transformGroup": "scss",
    "buildPath": "output/scss/",
    "files": [{
      "destination": "_variables.scss",
      "format": "scss/variables"
    }]
  },
  "css": {
    "transformGroup": "css",
    "buildPath": "output/css/",
    "files": [{
      "destination": "_variables.css",
      "format": "css/variables"
    }]
  }
}
Finally, let’s add a npm script in our package.json to build the style dictionary:
 "scripts": {
   "build": "style-dictionary build"
 },
Let’s see if it works:
npm run build
Wow! 🎉

We can see that it did generate the scss and css variables for us. This means we have finished the process of getting design tokens from Figma and exporting them as platform deliverables with Style Dictionary! 🎉
Automating the Generation of Platform Deliverables
Before we call it quits, there’s one more powerful thing we can do with our design to developer handoff of design tokens.
We can use GitHub Actions to automatically kick off the build of our style dictionary when a new design-tokens.json file is received.
Overview of GitHub Actions
Looking at an example GitHub Actions file can be confusing at first glance.
I highly recommend going through the official documentation, but I’ll provide a high-level explanation of how they work and how we’ll use them.
GitHub Actions are used to build a CI/CD pipeline without leaving GitHub. There are some awesome things that this allows us to do.
A GitHub action kicks off a workflow after it is triggered by an “event.” A workflow is a composition of “steps” which perform “actions” to do a certain “job” with your code. Each workflow can run multiple jobs in parallel.

For example, you could set an event that when code is pushed to a branch, it will run your unit tests and report the status.
These actions will run in a virtual environment which has to be specified. You can learn more about the virtual environment here.
Creating Our GitHub Action Workflow
Let’s create a workflow to build our style dictionary when a design-tokens.json file is pushed.
First, we’ll create a .github/workflows folder to store all the workflows for our style-dictionary repository.
Second, we’ll create an export-tokens-on-input.yml file and add the following code:
# .github/workflows/export-tokens-on-input.yml
name: Generate Tokens On Input

on:
  push:
    paths:
      - 'input/design-tokens.json'
So far, we have set the “event.” We want this workflow to be triggered with a design-tokens.json file is pushed to our input folder.
Next, we’ll give our workflow a job, building our style dictionary, when this event occurs:
# .github/workflows/export-tokens-on-input.yml
name: Generate Tokens On Input

on:
  push:
    paths:
      - 'input/design-tokens.json'

jobs:
  generate_tokens:
    runs-on: macos-latest
    steps:
    - name: Install Node Dependencies
      run: npm install
    - name: Build Style Dictionary
      run: npm run build
We’ve specified a job called generate_tokens that performs has two steps with their actions.
First, the “Install Node Dependencies” step runs npm install so that the virtual environment will have access to the Style Dictionary dependency.
Second, the “Build Style Dictionary” step runs npm run build on a macos machine with the latest version. When this step runs, it will generate two files in the output folder with our scss and css variables as we tested earlier.
We need to add a final step to commit the new platform deliverables generated by our style dictionary:
# .github/workflows/export-tokens-on-input.yml
name: Generate Tokens On Input

on:
  push:
    paths:
      - 'input/design-tokens.json'

jobs:
  generate_tokens:
    runs-on: macos-latest
    steps:
    - name: Install Node Dependencies
      run: npm install
    - name: Build Style Dictionary
      run: npm run build
    - name: Commit Generated Platform Deliverables
      id: "auto-commit-action"
      uses: stefanzweifel/git-auto-commit-action@v4
      with:
        commit_message: Update platform deliverables
There are common steps that are done with GitHub Actions. GitHub has organized some of these common steps into pre-defined steps. You can explore these pre-defined steps here. Also, developers can publish their pre-defined steps.
In the changes shown above, we use a pre-defined step called git-auto-commit-action to do the heavy lifting to commit the changes to the output folder containing the latest artifacts, or platform deliverables. Using
Ok, so we have some steps for our workflow to accomplish the job and building our style dictionary, and uploading the artifacts. However, our steps expect to be able to run node commands, so we’ll have to add some additional pre-defined steps to make that work:
# .github/workflows/export-tokens-on-input.yml
jobs:
  generate_tokens:
    runs-on: macos-latest
    steps:
+    - uses: actions/checkout@v2
+    - uses: actions/setup-node@v2
+      with:
+        node-version: '12'
    - name: Install Node Dependencies
      run: npm install
    - name: Build Style Dictionary
      run: npm run build
    - name: Commit Generated Platform Deliverables
      id: "auto-commit-action"
      uses: stefanzweifel/git-auto-commit-action@v4
      with:
        commit_message: Update platform deliverables
Let’s push this workflow to GitHub and see what happens.
Note: I ran into an issue where I could not publish the workflow locally. You will either have to push your changes without the workflow and then add the workflow in GitHub from the browser. Or, you can try this workaround.
Here is the final code: https://github.com/michaelmang/style-dictionary/pull/2

On GitHub, you can click on the Actions tab to see all the workflows for the style-dictionary repository.
I ran into a few formatting errors which caused GitHub to log some failed workflow runs.
Assuming your code matches mine at this point, there should not be any successful workflow run as our workflow should only be triggered when we update design-tokens.json.
As a true test, we can edit the design-tokens.json file in the browser with new content and see if our GitHub workflow runs and successfully updates the output folder with the new platform deliverables.
Replace your design-tokens.json file with the contents of this file.
Commit these changes on a new branch off of the main branch (so we can easily see the diff) and navigate back to the Actions tab on GitHub.
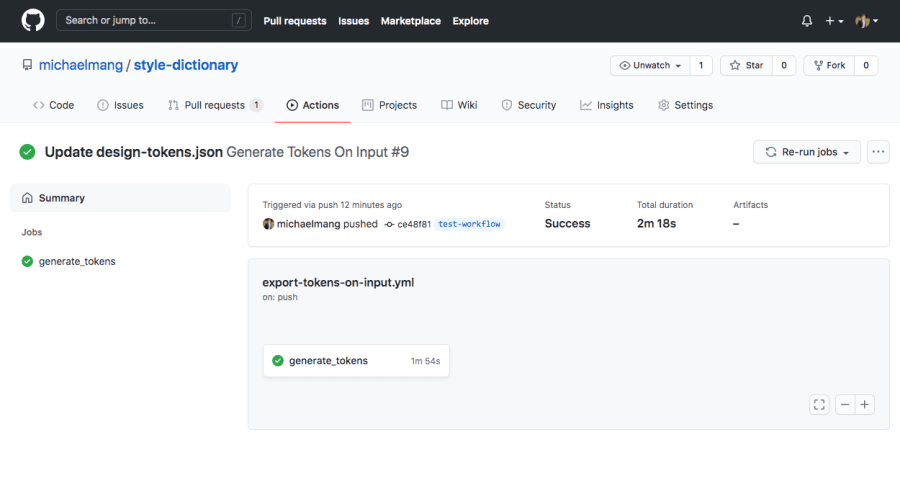
Since I named my commit “Update design-tokens.json,” I see that a workflow has been kicked off relating to that commit:

Ignore, the other workflows in my graphic. That’s because I had to try this several times to get it to work.
Click on the workflow for your latest commit and you’ll be able to see a summary:
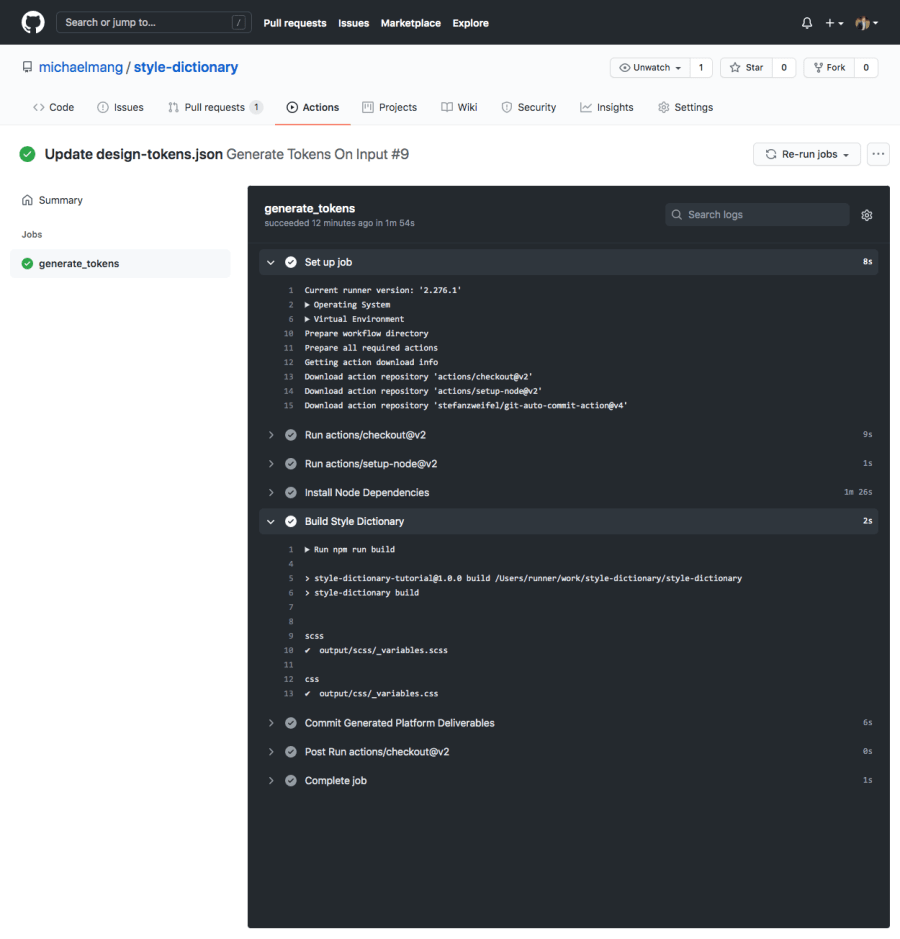
If we click on the card for our job in this workflow, “generate tokens,” we can see a detailed summary of all the steps that ran in this job:
Looks great! 🎉
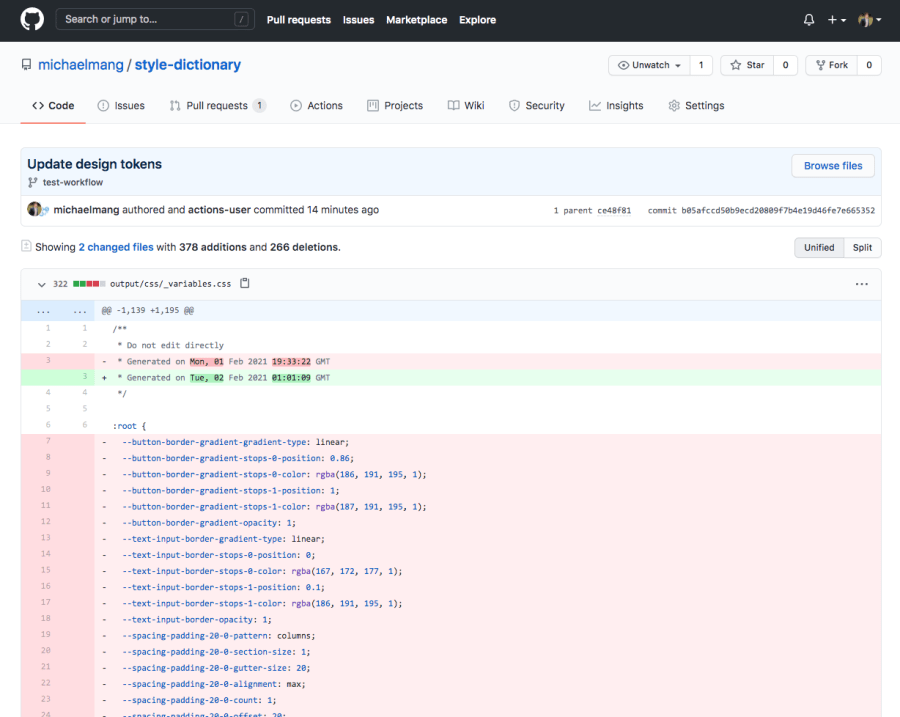
We can double-check this worked by comparing the branch we just created with the main branch.
We can see that there is a new commit on this branch, Update design tokens, with new platform deliverables as generated by our style dictionary as a result of our action:
Super cool! 🎉
Update: A UI For Generating Your GitHub Action
I decided to create a visual tool for generating this GitHub Action workflow.
You can view it here: https://design-tokens-github-actions-generator.netlify.app/transform-design-tokens-on-update
Conclusion
Pat yourself on the back. If you’ve made it through this far, you’ve picked up a great skill to be able to automate the process of handing design tokens off from designers to developers.
In the next article, we’ll investigate the best practices for applications across different platforms to consume these auto-generated deliverables.
Code: https://github.com/michaelmang/style-dictionary/pull/2

