A lengthy discussion on general principles for testing frontend code, different approaches for snapshot testing React component with Jest, and a proposal and experiment/tutorial on using Cypress screenshot testing to replace Jest snapshot testing for React components.
This is not a short and sweet tutorial for beginners that I usually love to do. However, I try to be mindful of not just tossing out technical words without explanation.
The Deficiency of Shallow Jest Snapshot Testing
I suggest you read that article first but the TL;DR is that I like to “set the boundary” for my Jest snapshots of React components to a single component.
Let’s say I had a React component with the following hierarchy:
// ParentComponent
// ChildComponent
// GrandChildComponent
// NodeModulesComponent
// NodeModulesChildComponent


// ParentComponent.jsx
function ParentComponent() {
  return (
    <div>
      <ChildComponent /> // renders GranChildComponent
      <NodeMoudlesComponent /> // renders NodeModulesChildComponent
    </div>
  )
}
I want my snapshot file to match what I see in the component I am testing
(ParentComponent in this example). I can
achieve this by mocking out
ChildComponent and
NodeModulesComponent so that the Jest
snapshot does not render any further down the hierarchy as it generates the
snapshot.
I have found this approach to be much more readable (since I can easily look
at the return of the component I am testing
and compare it to the generated snapshot since they share the same
boundaries–not having to worry about all the layers between what the parent
component returns and what it ultimately renders all the way down the chain).
There are some common objections to this approach that I have not found to be a problem after using it in a real-world codebase for over a year.
Some might say that this requires you to have to write more tests. I woudl
indeed have to write a test for
ParentComponent,
ChildComponent,
GrandChildComponent, etc., instead of testing
them all together by letting my snapshots render all the way down the chain.
My response, however, would be that while you might write more tests, the test at each component in the hierarchy tends to small, readable, and manageable. Mount-based testing (testing through a chunk of the hierarchy), in my humble opinion, can lead to one big, confusing blob of tests. Perhaps, there are solutions to this that I’m not aware of.
Another objection is that snapshot files can be hard to interpret when trying to compare a snapshot in Scenario A (everything renders) and Scenario B (one small piece no longer renders).
My response would be that using a tool like snapshot-diff it is very easy to read the difference in the snapshot between Scenario A and Scenario B. The tests themselves are compact as well:
// ParentComponent.spec.jsx
describe("ParentComponent", () => {
  let defaultSnapshot;


  it("matches the saved snapshot", () => {
    // render component with default props
    const elem = // ...

    // set the default snapshot to the result of a helper function that generates a snapshot to compare to the stored/generated snapshot
    defaultSnapshot = renderSnapshot(elem)

    // compare the snapshot from this test with the stored/generated snapshot
    expect(defaultSnapshot).toMatchSnapshot()
  })

  describe("is loading", () => {
    it("matches the saved snapshot", () => {
      // render component with default props except `isLoading` is set to `false`
      const elem = // ...

      const diffSnapshot = renderSnapshot(elem)

      // generates a snapshot diff thanks to `snapshot-diff` which exposes a new command called `toMatchDiffSnapshot`
      expect(defaultSnapshot).toMatchDiffSnapshot(diffSnapshot)
    })
  })
})
There is a third and final objection that does carry some weight, in my opinion.
By testing each component individually, and not extending the boundary to test multiple components in one set of tests, there is a gap in testing the integration.
In the example above, we test that
ParentComponent renders
ChildComponent and that
ChildComponent renders
GrandChildComponent, and what
GrandChildComponent renders to the DOM
(assuming it’s at the end of the hierarchy).
In a word, you have all these tests but you don’t really know what the user is seeing.
How I’ve Typically Handled The Deficiency of Shallow Jest Snapshot Testing
On my team, in addition to writing unit tests for all of our components, we do “manual testing” where we “test” all the integration points by opening our code locally, setting up the scenarios for each integration point, and taking a screenshot and pasting them into the PR description.
This makes us ensure that the integration of our components is working and the criteria for our changes to be accepted is met–even if all the unit tests are passing.
It’s worked for us but I’ve recently become more curious to ask:
Do I need all these snapshot tests if the acceptance criteria for my changes are always just verifying the integration?
Let me explain my curiosity a bit further.
Why I Became Curious About Moving Away From Shallow Jest Snapshot Testing
My preferred approach is to create the boundary of my snapshots one-level deep
(so that the return of the component shows
the same elements as the snapshot). To do this, I need to shallow render my
components.
This may be done with React’s Shallow Renderer. React’s documentation, however, recommeneds the usage of the Enzyme API for shallow rendering.
My concern with Enzyme is that 1) it has struggled to get official adoption up and running for React 17 and 2) the satisfaction in the community seems to have gone done significantly.
It isn’t even on the big chart in the 2020 State of JavaScript results.

Alternatively, tools like React Testing Library have gained a lot of traction. That library, however, operates from a guiding principle that tests should be mostly integration. Boundaries for snapshots tests can be expanded so that the rendered output captured in the snapshots includes what the user actually sees in the browser.
It also means that snapshots can include a “chunk” of the rendered output that tests an integration point (instead of testing the rendered output of individual tests and assume that the integration will work as expected). By integration point, I mean that you test an experience that a user encounters that is a result of multiple components working together.
For example, instead of testing Form,
FormHeader,
FormBody,
FormFooter,
TextInput,
Label,
NumberSelector, etc., components, you can let
the boundary be the entire form. By mimicking a user’s actions with the entire
form and taking snapshots in all the different scenarios where the rendered
output differs, you test the rendered output of a logical chunk, or
integration point. Because you test an integration point that the user
actually interacts with, you could argue that you have a higher level of
confidence that your code is all functioning well together.
In summary, the trend in the community towards mount-based approaches and tools makes the case more compelling.
Still, I have a concern that the larger the boundary of your tests, the more friction when trying to interpret a snapshot and how it got the output it did. Also, the larger the boundary, the larger the tests—and the larger the complexity of the integration point, the larger the complexity to maintain your snapshot tests.
This has me asking, what is the purpose of our snapshot tests anyway?
What’s the purpose of our snapshot tests?
It’s already been mention that mount-based approaches like React Testing Library are guided by the principle that tests resemble the behavior of a user. This type of testing can increase confidence that your code is working for the user, not the developer, as expected.
This begs some questions. First, is a high level of confidence that the code is working for the user as expected the primary goal of our snapshot tests? Second, are snapshot tests with a mount-based approach the best means to that end?
I can’t give a straight answer to the first question, but I can call out some additional goals, or benefits, of our tests.
First, our tests can effectively work as a commentary of our code. They can help explain what the original intent of the code was, what the different scenarios that cause dynamic rendering are, and when we make changes, how our new code differs from the existing implementation.
They also allow us to refactor with confidence. If we refactor our code, and the rendered output has not changed, we’ll know that we’ve refactored while keeping things intact. Inversely, if our tests break, we want our tests to give us a high level of confidence that we changed something that broke an intended functionality. When we update our test, we want to ensure that we are knowingly updating the functionality.
In weighing these additional benefits of code, it seems that two things are true at once.
We want our tests to give us a high level of confidence that our code is working as the user would expect, and that our code is explained well and is working as originally intended (and that we are knowingly changing that intent when we introduce new code).
In a word, our tests are for the user, to be sure, but they’re also for the developer.
Now, to answer my second question, let’s think about the trade-offs between shallow and mount-based testing for these two main goals of our tests.
Mount-based testing is obviously better for ensuring our code works as the user expects. We’ve discussed that so far. However, I think it is weaker for ensuring that our code is explained well and works as the previous developer(s) that touched it expected.
Let’s say I have one test for the integration of a form that a user interacts with, consisting of many components working together. As a developer, I start to refactor all the components that make up the form, and when I’m done, I realize that the snapshot has failed. It can be hard to track down which component in the hierarchy of the form caused the failing test. If I had shallow-based tests for each component of the form, it would be clear which component caused the failing snapshot (since each component maps to one file with its own snapshots) and how the new code has changed the previous intent. This seems to give an edge to shallow-based snapshots over mount-based, especially as integrations get more complex.
With all this in mind, I had a wild hair idea.
What if we could have integration/user-like tests and shallow-based tests so we can get all the types of benefits?
That would mean we would have to write integration snapshot tests and shallow-based snapshot tests. That’s a lot of tests for ensuring the rendered output to the DOM.
Hmm…
What if we can write integration tests that ensure our code is working as the user expects without explicitly testing the rendered output to the DOM.
An Alternative to Mount-Based Snapshots
If the main goal of integration tests is to ensure our code is working as the user expects, why don’t we literally mimic the user and take screenshots of what they see instead of snapshots of code that renders what they see?
This question stirred in my head, and I wanted an answer. So, I looked to see what Cypress, a frontend testing tool for testing your code in the browser and researched to see what was possible.
Cypress can be used to do a variety of styles of testing. Here’s a drawing I made to explain how I conceptualize the differences.
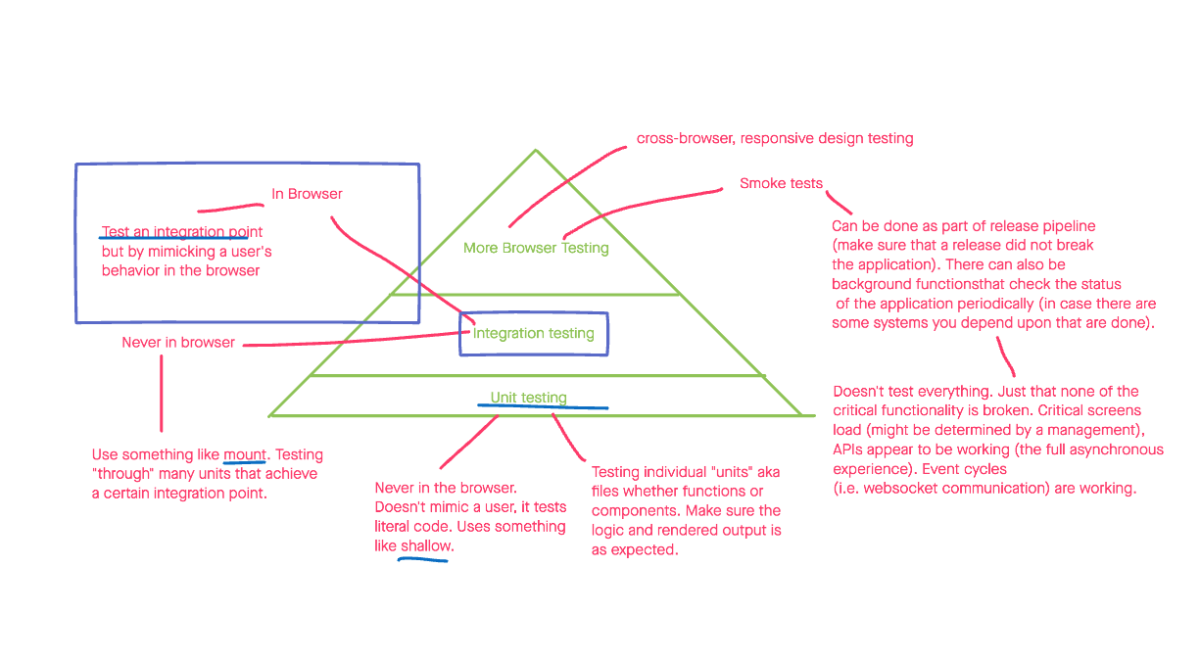
Cypress can be used wherever I’ve mentioned “browser” in describing a type of testing. Cypress can run an application in a real browser and exposes an API to mimic the user.
Previously, I have seen tools like Cypress used for smoke tests (ensuring that the critical parts of your application are working) or cross-browser/responsive design testing.
This type of testing is usually called end-to-end testing, I prefer to call it “browser” testing. I like this because “browser” testing with Cypress can be done in a local or production environment. Testing a production environment (at least how my brain works), is what I associate with end-to-end testing (because you are testing a frontend with a production backend versus testing a frontend with a mock/local backend). If that’s a helpful distinction, great. If not, just ignore it.
The main point is that Cypress has not usually been used for the integration of components. This is done in a tool like Jest. However, I’ve been curious as to whether there is a reason not to use Cypress for these integration tests. The benefit would be that it would run in a real browser and has a robust API for mimicking a user.
Again, if the main goal of integration tests is to ensure our code is working as the user expects, why don’t we literally mimic the user and take screenshots of what they see instead of snapshots of code that renders what they see?
It turns out that I’m not the first to think about moving mount-based, integration tests to an actual browser. Cypress has a Component Testing library that is in Alpha.
Ideally, I wanted to use Cypress for screenshot tests just like I would Jest for snapshot tests.
The Cypress repository for its React Component Testing library had a comparison capturing some of the differences I had been envisioning myself:
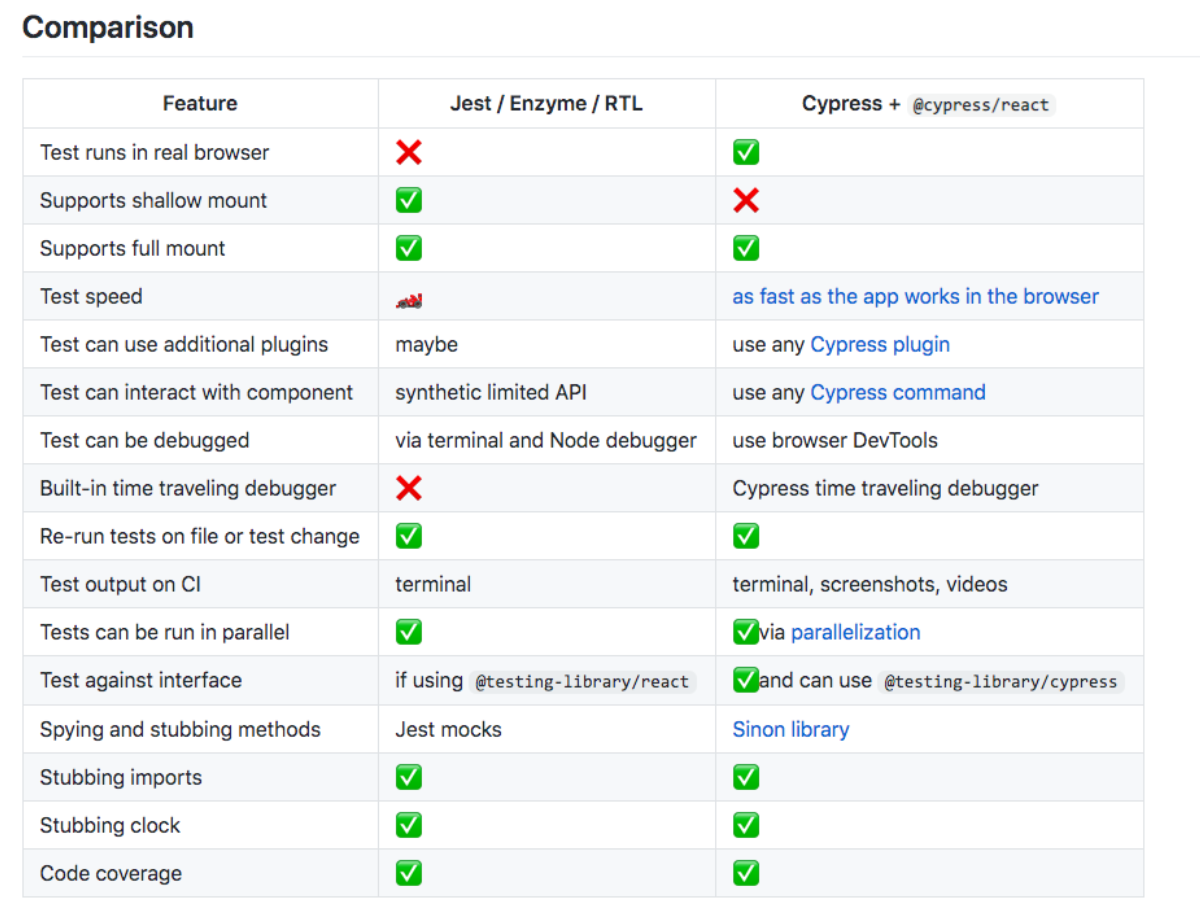
How promising!
I’ve wanted to approach my Cypress tests in the same way as my Jest tests.
I want to take a screenshot for the “default” case/scenario, and then create
an image diff between the default scenario and the “special”/“modifying”
scenario. This would be the visual equivalent of using
snapshot-diff in my Jest tests as I
previously outlined:
// ParentComponent.spec.jsx
describe("ParentComponent", () => {
  let defaultSnapshot;

  it("matches the saved snapshot", () => {
    // render component with default props
    const elem = // ...


    // set the default snapshot to the result of a helper function that generates a snapshot to compare to the stored/generated snapshot
    defaultSnapshot = renderSnapshot(elem)


    // compare the snapshot from this test with the stored/generated snapshot
    expect(defaultSnapshot).toMatchSnapshot()
  })

  describe("is loading", () => {
    it("matches the saved snapshot", () => {
      // render component with default props except `isLoading` is set to `false`
      const elem = // ...

      const diffSnapshot = renderSnapshot(elem)

      // generates a snapshot diff thanks to `snapshot-diff` which exposes a new command called `toMatchDiffSnapshot`
      expect(defaultSnapshot).toMatchDiffSnapshot(diffSnapshot)
    })
  })
})
Cypress Integration Sceenshots Tutorial
Configuration
Taking a shot at this approach, I started by initiating a create a new React app and installing Cypress:
npx create-react-app cypress-integration-screenshots
cd cypress-integration-screenshots
npm i cypress
I noticed that Cypress has recently introduced a component testing library so that we can mount a React component and use Cypress commands to carry out actions and write assertions.
The official instructions say to install the following:
// skip this step
npm i cypress-react-unit-test
…but
digging through the actual source code, it looks like we can install a
@cypress/react package (which I did):
npm i @cypress/react
Before I got rolling with running Cypress, I created a sample application with an integration point that we can test with screenshots.
The mini-application has a Home page with a link to a Pictures page where you
can generate random photos with the click of a button.

You can clone the starter repository here: https://github.com/michaelmang/cypress-integration-screenshots
I then updated the scripts in my
package.json to open the
Cypress Test Runner
on npm start:
  "scripts": {
    // ...
    "integration-test": "cypress open"
  }
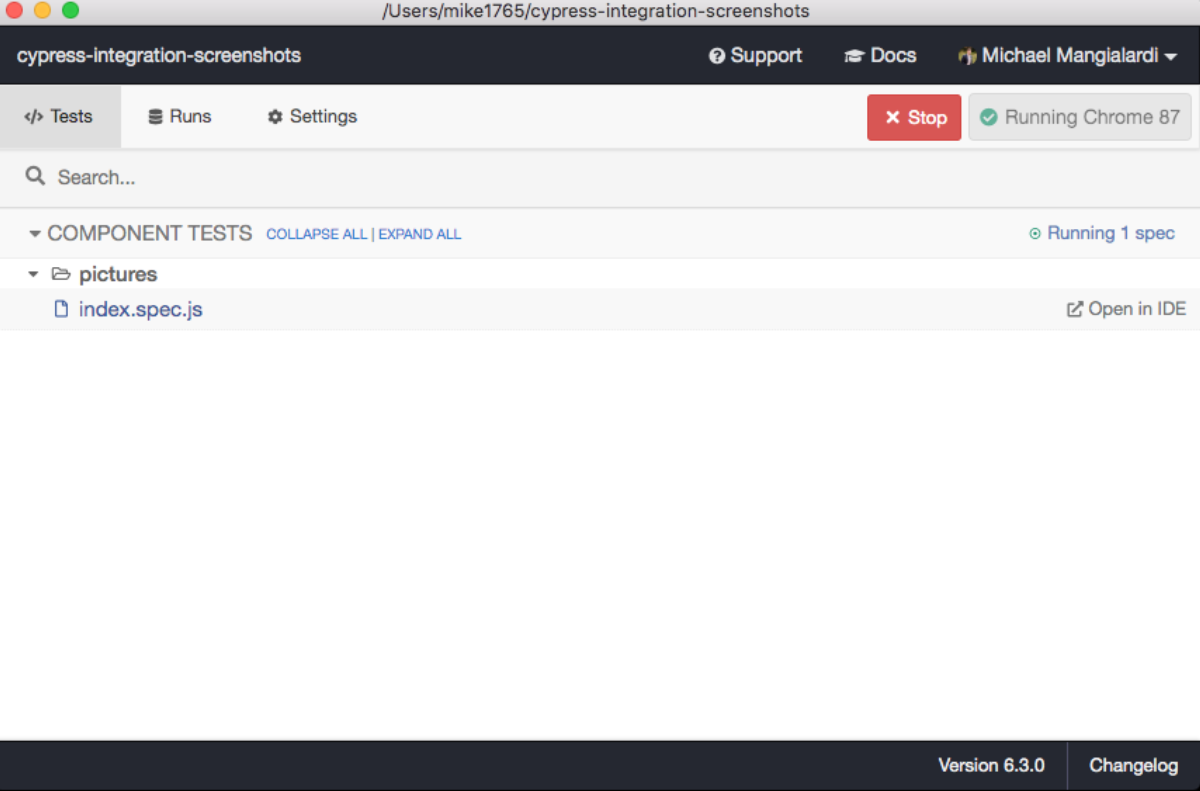
Running npm run integration-test…
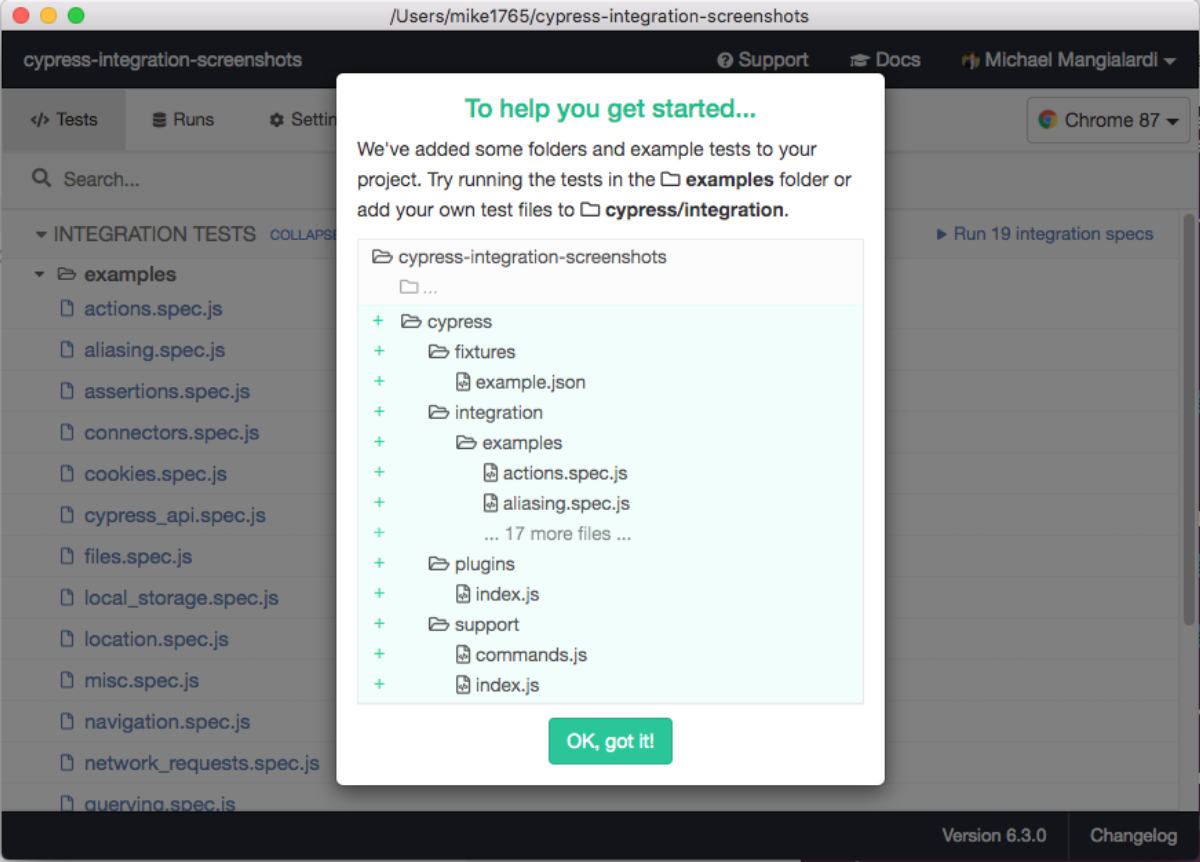
Cypress lets you know that it is going to create some boilerplate files and organize them for you.
After clicking ok, you should see these new folders and files in your code editor:
You’ll notice some eslint errors in the graphic above. I resolved those by
installing eslint-plugin-cypress and
configuring it in the package.json file:
npm i eslint-plugin-cypress
"eslintConfig": {
  "extends": [
    // ...
    "plugin:cypress/recommended"
  ]
}
As for the Cypress boilerplate, I decided to remove the
fixtures directory as well as the
integration one. However, they keep
respawning whenever the tests re-ran 🤷♂️.
Even though I’ve been calling the testing of chunks of our application as the
user interacts with the “integration” tests. Cypress requires you to add all
tests using the component testing library in a
components folder.
I added the components folder and a
subsequent folder corresponding to the page I wanted to test.
For the example app, it looked like this:
cypress/components/pictures
I also thought it would be a good organization to contain tests for specific integrations (i.e. the form) should a page be more complicated than the ones I created for the demo.
For example,
cypress/components/pictures/submitForm if I
added a submit form in addition to the picture generator (which I decided not
to do in the spirit of keeping this demo simple).
With the demo app created, I configured Cypress to run and test my app in the
browser by configuring the baseUrl in
cypress.json:
{
"baseUrl": "http://localhost:3000/"
}
Following the unofficial instructions for Cypress’ React component testing plugin, I ran a wizard that auto-configured my projects:
npx @cypress/react init
That didn’t work…
…so I did it manually.
First, I included the plugin in the project’s
cypress/support/index.js:
require('@cypress/react/support')
Second, I added the plugin in the projects
cypress/plugins/index.js, so Cypress can load
your components:
module.exports = (on, config) => {
  // `on` is used to hook into various events Cypress emits
  // `config` is the resolved Cypress config
  require('@cypress/react/plugins/react-scripts')(on, config)
  return config
}
Lastly, I turned the experimental component support on in the
cypress.json, also specifying the folder with
all component tests:
{
  // ...
  "experimentalComponentTesting": true,
  "componentFolder": "cypress/components"
}
One last piece of configuration. There is a Cypress port of Testing Library.
This exposes custom commands (cy.theseAreCommands()) on the cy instance, allowing us to use the
same core API as used in React Testing Library (the popular mount-based
testing library I’ve mentioned before).
I thought this would not only making selecting/controlling elements in the browser easier but would also make the transition to Cypress tests easier since it’s a familiar API.
I installed this…
npm i @testing-library/cypress
…and added its custom commands via the projects
cypress/support/commands.js file:
import '@testing-library/cypress/add-commands'
Writing the Cypress Integration Screenshot Tests
Next, I went to write a test that would mount the app page and take a screenshot of the loaded component (just to see what we’re working with–eventually I’ll want to mimic a user’s input to go to the Pictures page and take some screenshots there):
cypress/components/pictures/index.spec.js
import { mount } from '@cypress/react'

import App from "../../../src/App"

describe('Pictures', () => {
  it('matches the saved screenshot', () => {
    mount(
      <App />
    )

    cy.screenshot()
  })
})
I run the test via the test runner…
…drum roll 🥁…
…and I see nothing rendered in the browser 🤔
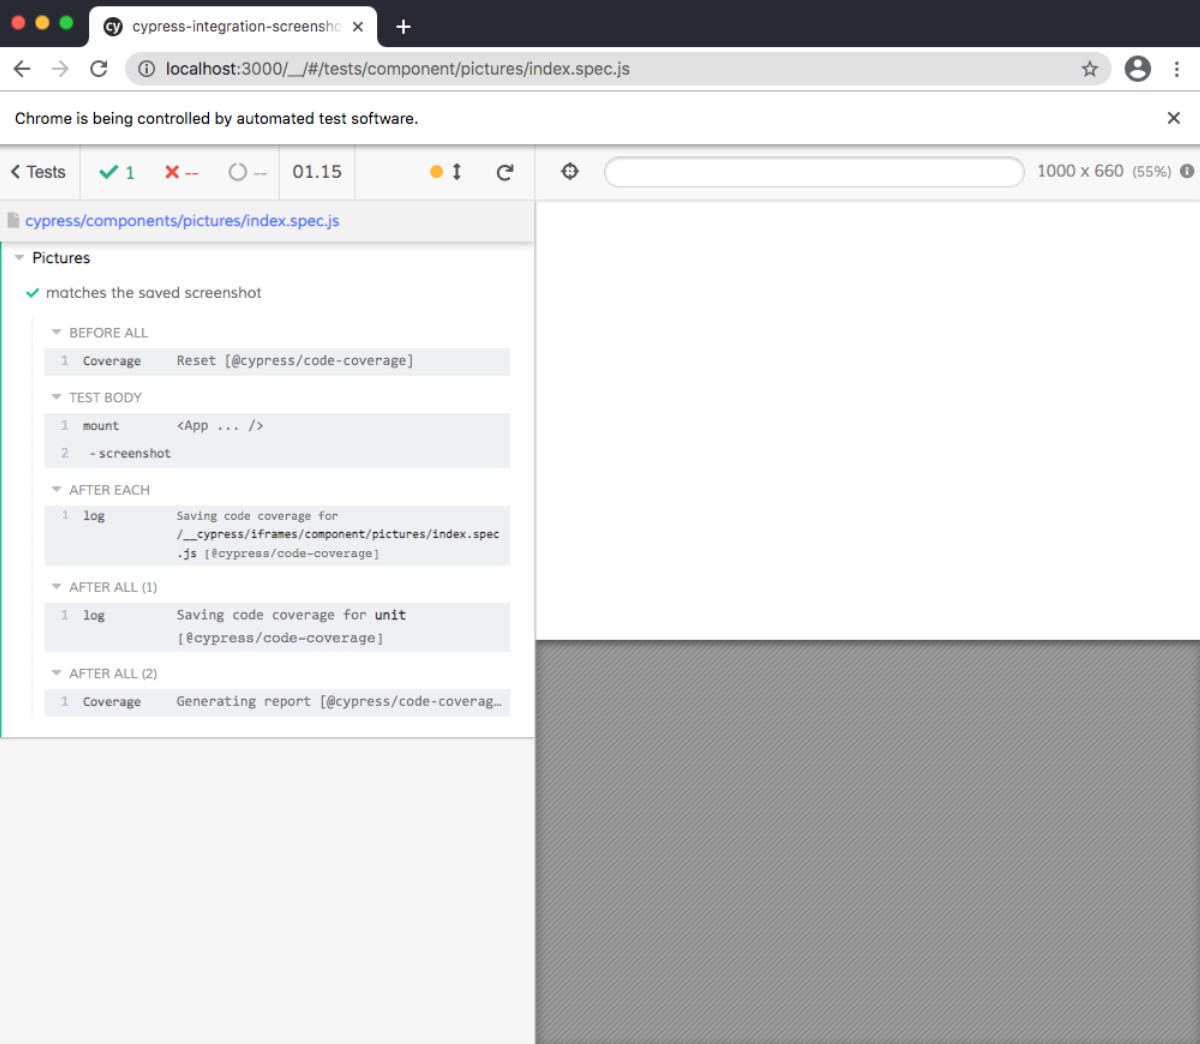
I then tried mounting the Pictures components
as opposed to the entire app and then navigating to it in the browser:
// cypress/components/pictures/index.spec.js
import { mount } from '@cypress/react'

import Pictures from "../../../src/pages/pictures"
import getPictures from '../../../src/utils/getPictures'

describe('Pictures', () => {
  it('matches the saved screenshot', () => {
    renderComponent()

    cy.screenshot()
  })

  function renderComponent(props = {}) {
    mount(
      <Pictures
        isLoading={false}
        data={getPictures()}
        onGenerateNewPictures={() => {}}
        {...props}
      />
    )
  }
})
Since this component receives props, I created a handy
renderComponent function that will mount the
component with the default props, creating the default scenario.
Later on, I figure I can call this function with “modifier” props to get into the “special” scenarios where I (hopefully) can compare screenshots to see the visual difference.
This approach, as opposed to mounting the entire
App, is not ideal since I have to mock out
the passing of data via props. This is creating some friction with the
principle to literally test like the user (since the user doesn’t mock out the
flow of data).
But since I couldn’t get the ideal approach to work, it was time to give this one a whirl 🌪️…
This time the component mounted as expected:
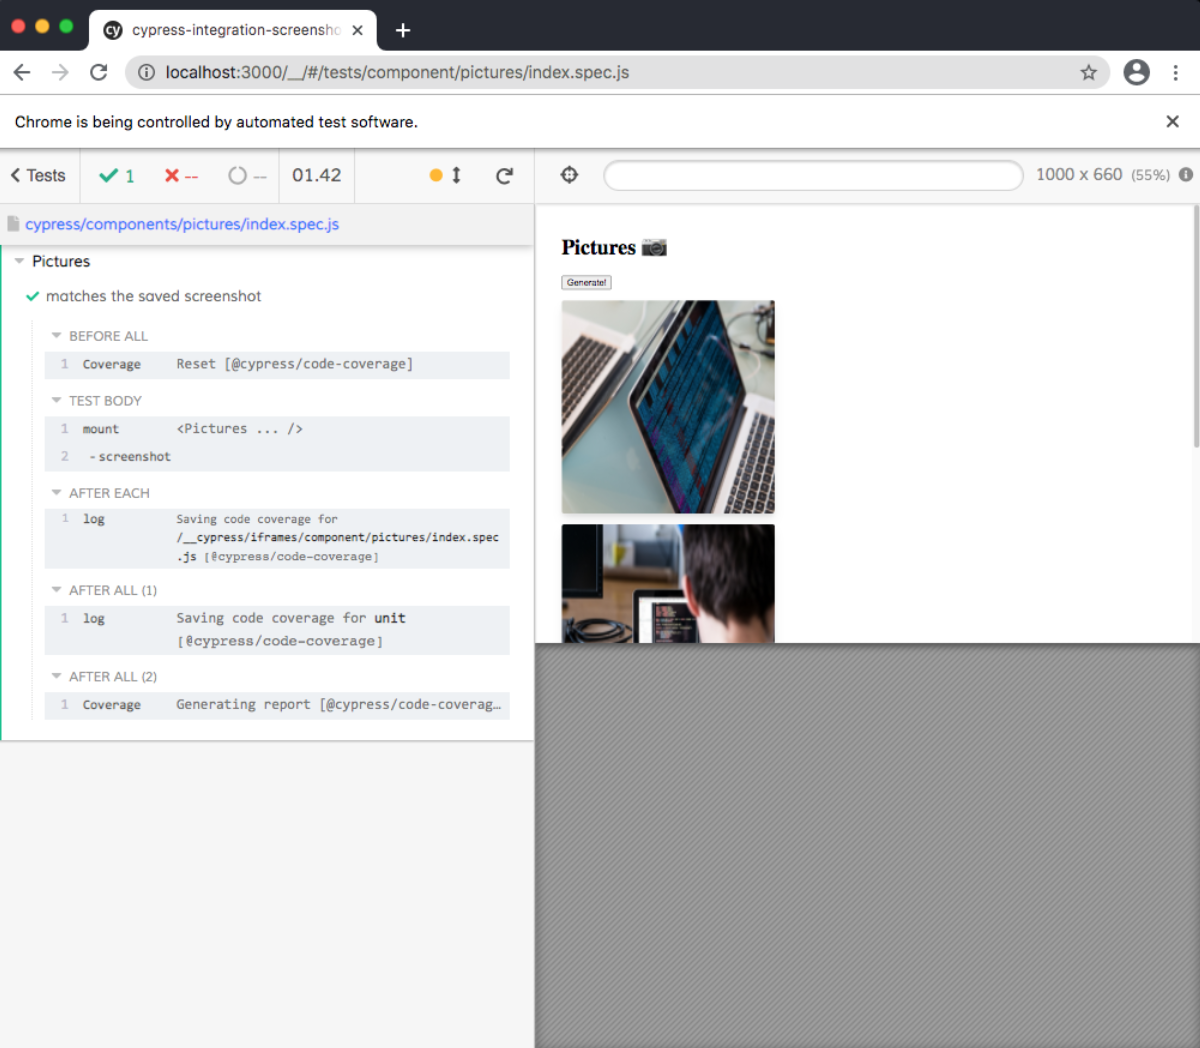
I could also see that cy.screenshot() had
stored the screenshot in
cypress/screenshots/[currentDirectory]/[currentFile]:
So close! I figured it could
add a little wait so the pictures can load
follow this suggestion:
// cypress/components/pictures/index.spec.jsx
renderComponent()
+ cy.get('img').and(($img) => {
+ expect($img[0].naturalWidth).to.be.greaterThan(0)
+ })
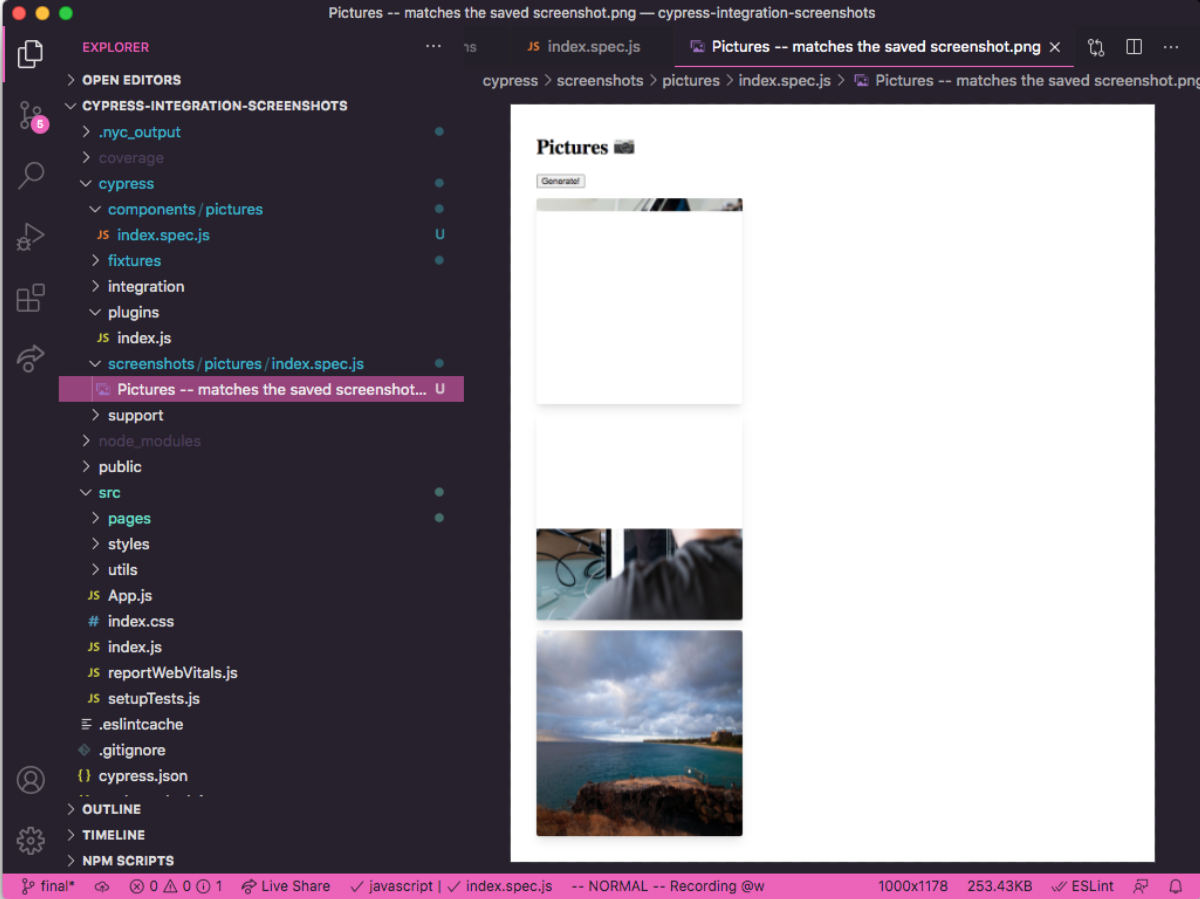
cy.screenshot()

That’s better!
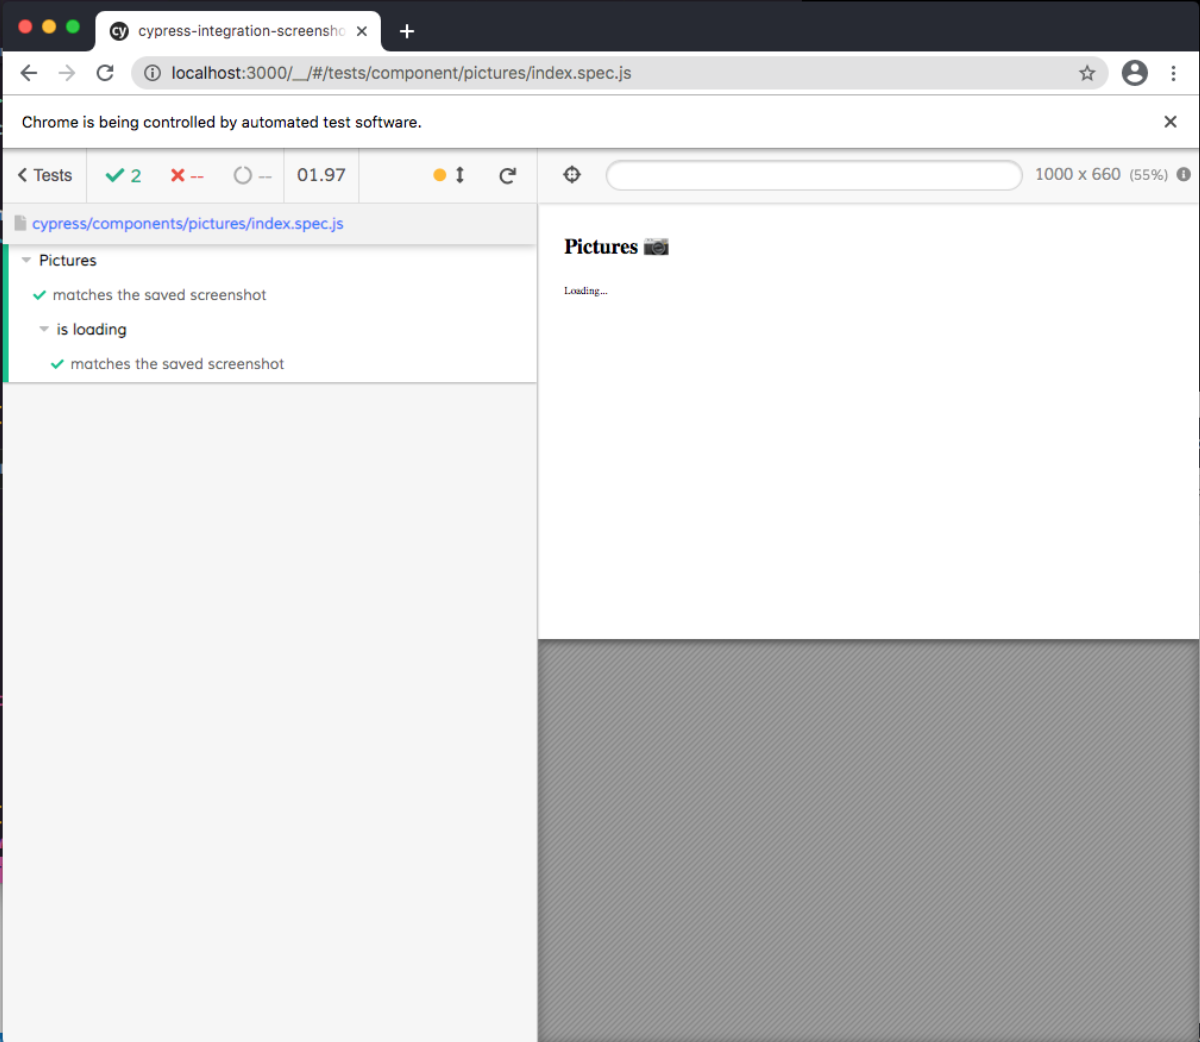
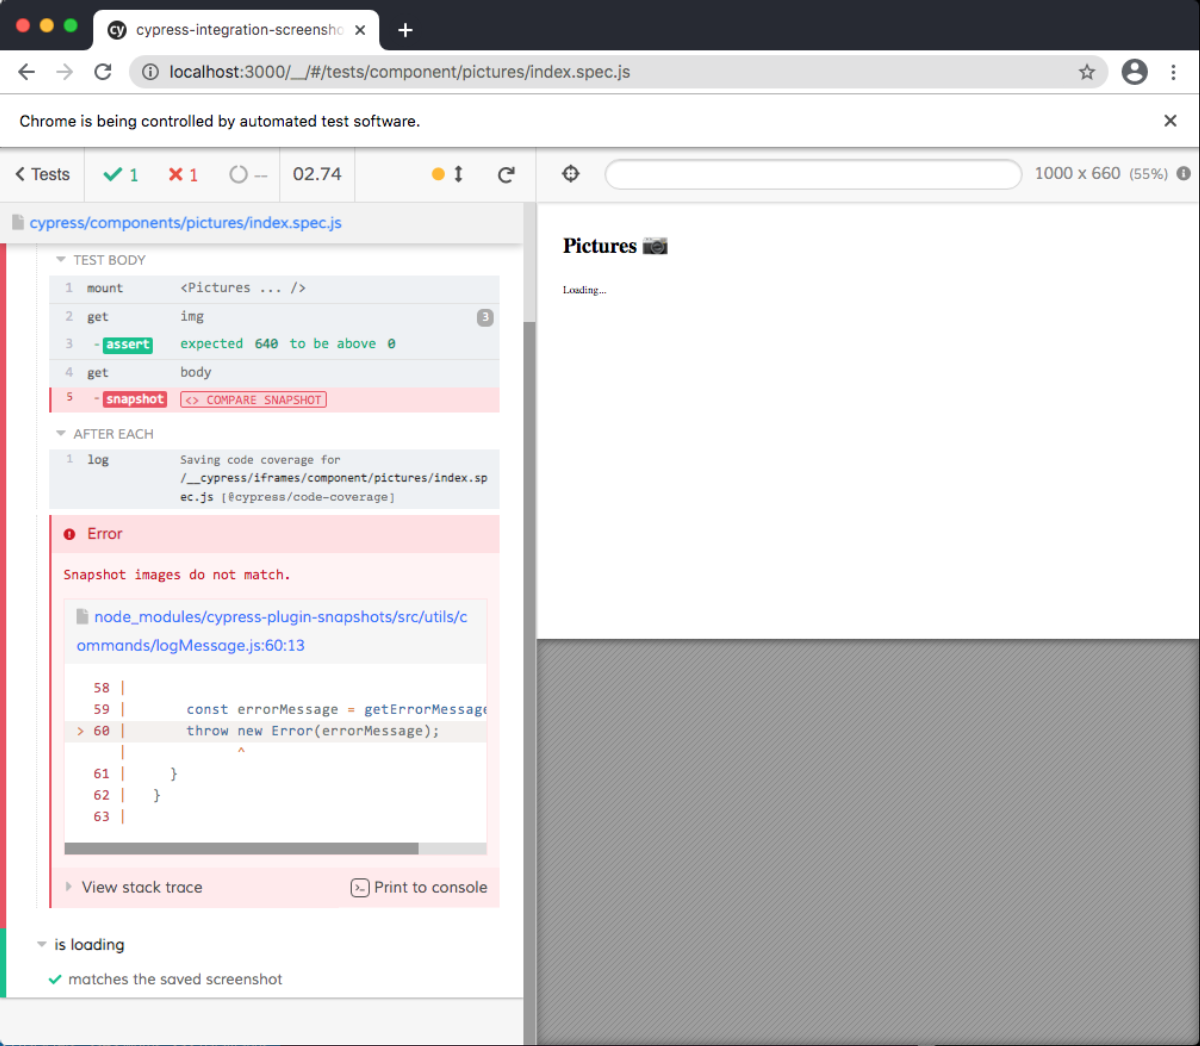
Finally, the moment I had been waiting for…doing a snapshot of a “special” scenario (when the component is loading in this case).
// cypress/components/pictures/index.jsx
describe("is loading", () => {
  it('matches the saved screenshot', () => {
    renderComponent({
      isLoading: true,
    })


    cy.screenshot()
  })
})
The test ran this additional scenario and generated the expected snapshot:
For the final meat and taters, I just needed to use some sort of Cypress plugin to do a visual regression test between the default screenshot (not loading) and the special snapshot (loading).
Poking around the official documentation of visual testing plugins, I noticed something about doing snapshot testing for your Cypress component tests.
It turns out that there was a plugin for generating JSON snapshots OR image snapshots.
BINGO!
So I follow the documented configuration…
-
Install the plugin
npm install cypress-plugin-snapshots -
Add the plugin to
cypress/plugins/index.js+ require('cypress-plugin-snapshots/plugin').initPlugin(on, config) -
Add the import to
cypress/support/index.js+ import 'cypress-plugin-snapshots/commands'
Finally, I had to update my tests so that the “default” screenshot had a
specified name, that way, I could update the “special” screenshot to compare
to the default (by
passing the name as an option
to the new cy.toMatchImageSnapshot() command:
// cypress/components/pictures/index.spec.jsx

+ const DEFAULT_SNAPSHOT = { name:"cypress_components_pictures__default_snapshot" }

// ...

it('matches the saved screenshot', () => {
  // ...
  +   cy.get("body").toMatchImageSnapshot(DEFAULT_SNAPSHOT)
})

describe("is loading", () => {
  it('matches the saved screenshot', () => {
    // ...
  +      cy.get("body").toMatchImageSnapshot(DEFAULT_SNAPSHOT)
  })
})
The one difference with the
toMatchImageSnapshot command is that it has
to be called on a selected DOM element, not the global
cy. Since I wanted the entire page, I
selected the body element.
Crossing my fingers 🤞 …
Did it work?
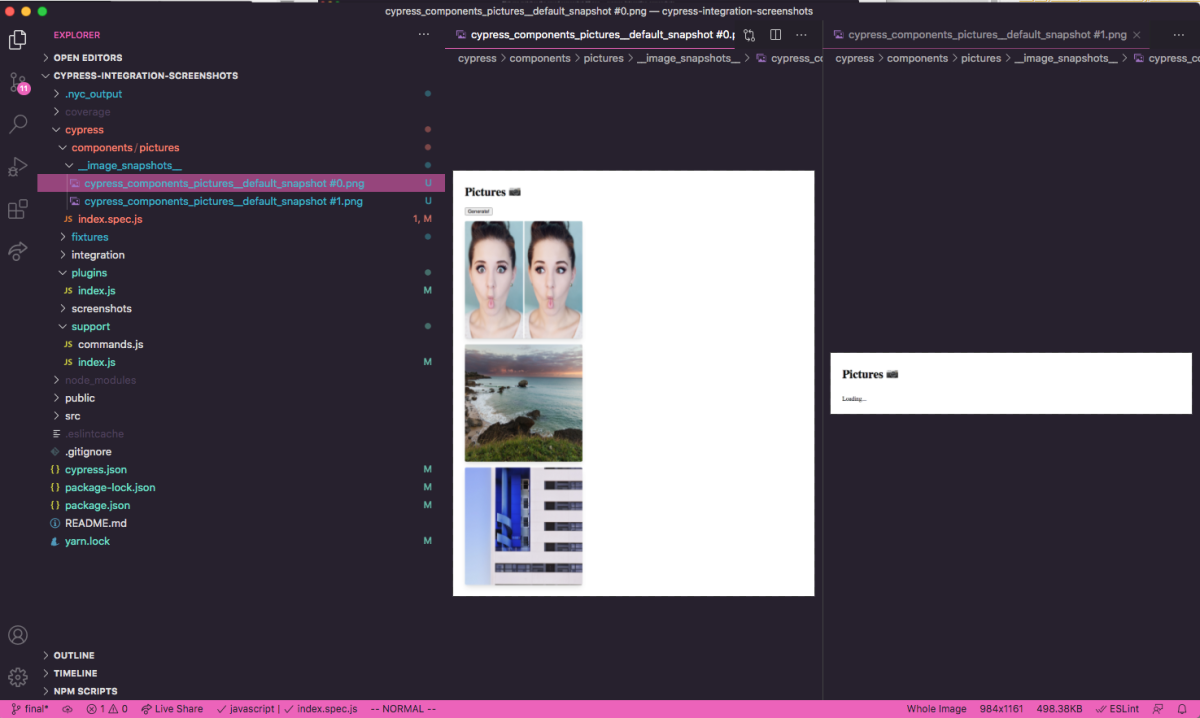
Ok, so it added the screenshots to a generated
__image_snapshots__ folder in the same
directory as the test, similar to how Jest snapshots generate a
__snapshots__.
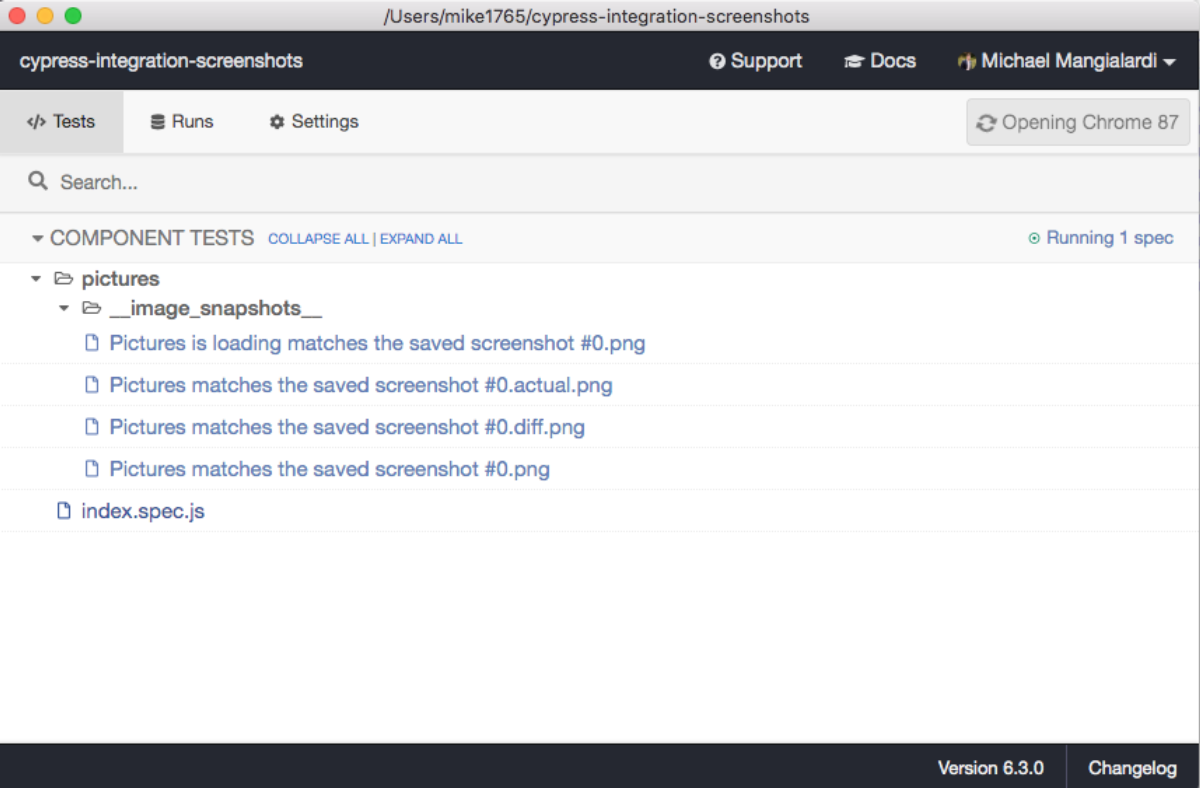
That makes sense. However, by doing this, the generated snapshots appear in the test runner (even though they aren’t tests):
It looks like I missed a step in the documentation that can override this
behavior by updating the project’s
cypress.json:
"ignoreTestFiles": [
"**/__snapshots__/*",
"**/__image_snapshots__/*"
]
Phew!
Another observation, I personally prefer the distinction between “snapshots”
and “screenshots” for stored JSON blobs versus images. However,
looking at the possible configuration overrides, there is no option to rename
__image_snapshots__ to
__screenshots__ (and I double-checked the
documentation this time), so I’ll have to stick with it.
My final observation was disappointing. I was hoping that providing the same name for each screenshot would show the visual difference between the first screenshot and the second screenshot. By doing this, I would effectively have implemented snapshot-diff with Cypress.
It turns out that it appends duplicate test names with
#[index].
After my first test run, there were
cypress_components_pictures__default_snapshot #0
and
cypress_components_pictures__default_snapshot #1
screenshots.
Thinking about it, this isn’t too surprising. I think the intention of the
cypress-plugin-snapshots plugin is to work
like Jest snapshots. It will store a screenshot/image snapshot for each
individual test where you call
toMatchImageSnapshot. If you change the
rendered output for that scenario, it will then show the diff.
I confirmed this by running the tests again:
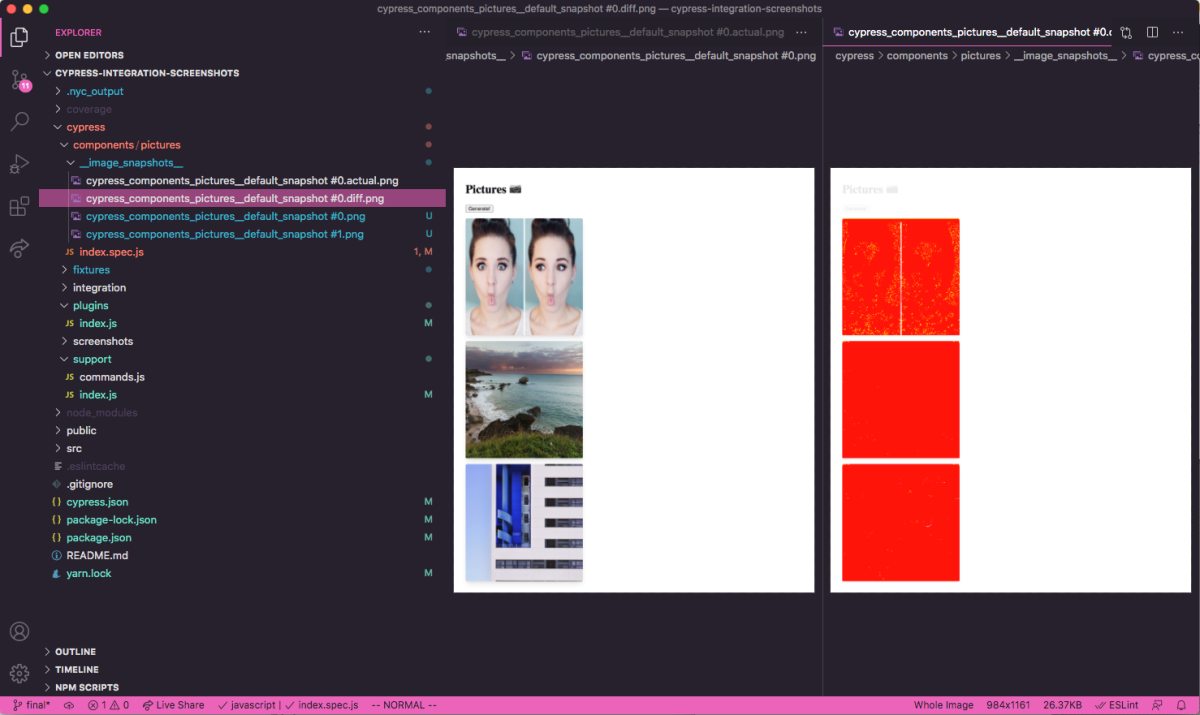
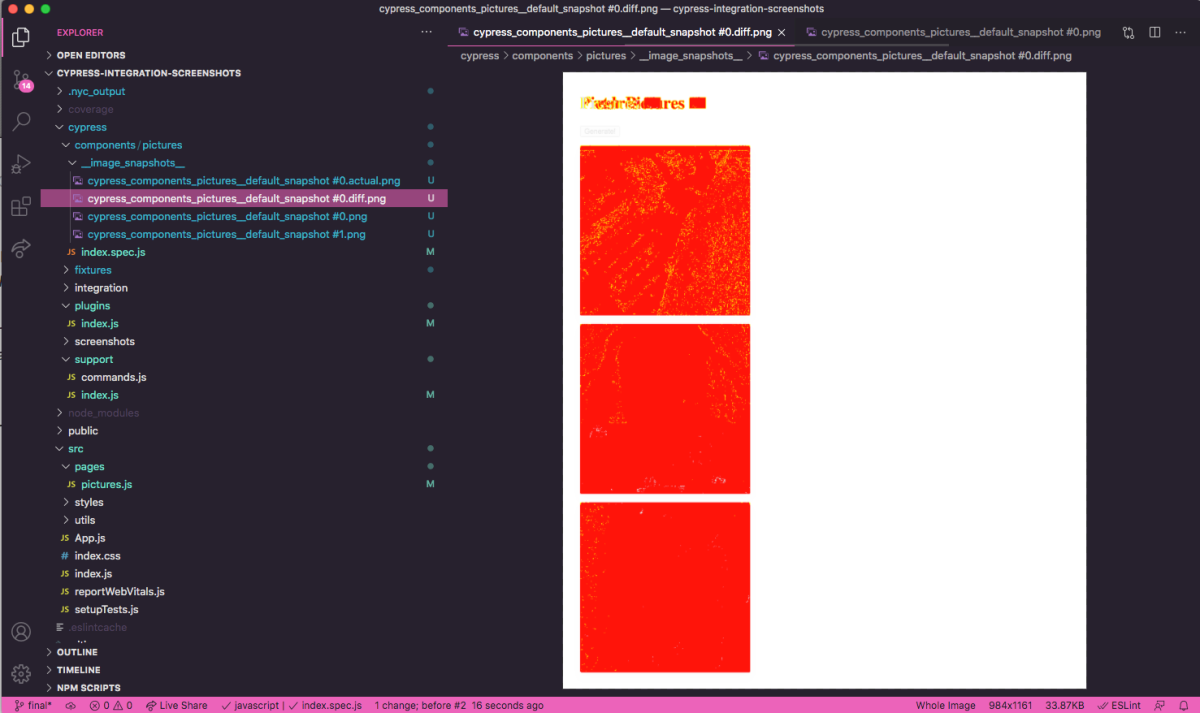
The test fails because there was a difference between the rendered output shown in the stored screenshot and the current snapshot when the test ran.
Normally, this would only happen when you make an actual change in the component. It broke with my application because the pictures are new on every load, which is an edge case.
What If I change the title of the page from “Pictures” to “Fresh Pictures”?
// src/pages/pictures.js
- Pictures
+ Fresh Pictures
As I expected, I see a failing test because of a failed snapshot comparison. We see the visual difference in the page title:
However, I don’t see a snapshot diff for the loading scenario (even though it had the same title change). In fact, I don’t see any screenshot in the loading scenario with the new title “Fresh Pictures.”
Ok, the test is failing. What is the equivalent of pressing
-u in Jest?
I couldn’t figure it out other than to enable this to be done automatically by
updating this property in cypress.json:
"env": {
  "cypress-plugin-snapshots": {
    "updateSnapshots": true
  }
}
Running the test again, the snapshots pass.

I see that the loading scenario in the test browser has the new title, but I still don’t see a stored screenshot for it. I concluded that my attempt to get a snapshot diff by using the same name is causing some weirdness.
That’s all the experimentation I’m going to do for now.
You can see the final code here: https://github.com/michaelmang/cypress-integration-screenshots/pull/1
Conclusion
Ok, so I was able to confirm that you could use Cypress screenshots to replace Jest snapshot testing. It’s definitely not as smooth but maybe there’s some potential for the future. An important ask would be to have a smooth way to compare failing snapshots and update screenshots in the test runner, similar to Jest. I have to remember that Cypress’ support for testing React components is in Alpha.
A disappointment was that there seems to be no way to do a “screenshot diff” so that you can interpret what is different between different scenarios (like I’m used to doing with Jest snapshots).
Maybe this isn’t needed.
With Jest snapshots, you are looking at a JSON blob so a tool like snapshot-diff is very valuable so you can know what is different between your default snapshot and the special scenarios. With Cypress screenshots, it’s a graphic. Your eye has a better shot at determining the difference when comparing images versus when comparing JSON blobs.
After all, the process of updating Jest snapshots is not fully automatic either. You have to carefully review the snapshots and ensure that the changes are what you expect before updating. Can the developer make a mistake? Definitely. But a developer can make mistakes in other places besides snapshot tests. Snapshot tests have to be a part of the code review process along with all the other code.
The bottom line is that if you prefer to (mostly) write tests that behave like the user, transitioning to Cypress screenshots seems to be the next logical step–assuming that the tooling gets its needed update.
If you see value in shallow-based testing but want to fill in the gap for integration testing, Cypress integration tests could be used to fill that gap.
Of course, it all comes down to how much effort you can afford to spend, and you must weigh the tradeoffs for yourself.
I hope this article helps you through weighing those tradeoffs and helps all of us to think through these problems so we can make an impact through the creation of an improved array of frontend tools.
Would love to hear y’alls thoughts. Cheers!

