What Are We Testing?
Jest snapshot testing is primarily used for testing the rendered output of React components.
The rendered output is ultimately the element(s) that render in the DOM:
For example, here’s a standard React component that renders a title:
const Title = ({ children }) => <h1>{children}</h1>
Title renders a simple h1 element. A snapshot test would ensure that this component output an h1 given the children input.
The aim is that if we test the rendered output of all our React components in an application, we will have effectively tested what is being shown to a user.
Dynamic Rendered Output
Of course, React is dynamic.
The rendered output can vary based on the input (props):
const Title = ({ children, className }) => (
  <h1 className={className}>{children}</h1>
)
It can also vary based on a component’s state:
const FancyTitle = ({ children }) => {
  const [isHighlighted, setIsHighlighted] = useState(false)

  const handleClick = () => {
    setIsHighlighted(true)
  }

  const style = { color: isHighlighted ? 'red' : 'black' }

  return <h1 onClick={handleClick} style={style}>{children}</h1>
}
When testing the rendered output, we want to make sure we cover all the dynamic outputs.
What Does It Not Test?
Snapshot tests do not cover the business logic of components.
For example, consider the following component:
const ClearStorageButton = ({ children }) => {
  const handleClick = () => {
    window.localStorage.clear()
  }

  return <button onClick={handleClick}>{children}</button>
}
Snapshot tests can ensure that the button is rendered, but they do not cover that when the onClick prop will effectively clear localStorage.
How Did We Test This?
Before diving into snapshot testing, let’s talk about the former alternative.
#1 Plain Enzyme and Jest Matchers
Using Enzyme and Jest, we can “wrap” our component in order to traverse the rendered output and assert that the output is what we expect.
// implementation
const Title = ({ children }) => <h1>{children}</h1>
// test
const subject = shallow(<Title>Some Title</Title>)
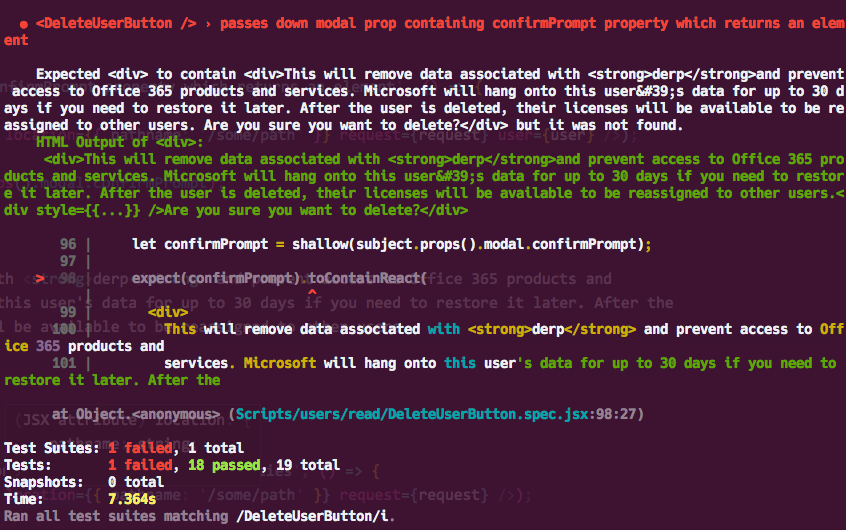
expect(subject).toContainReact(<h1>Some Title</h1>)
#2 Custom Enzyme Matchers for Jest
jest-enzyme is a package that provides custom matchers that make testing the rendered output easier:
// implementation
const Title = ({ children }) => <h1>{children}</h1>

// test
const subject = shallow(<Title>Some Title</Title>)

expect(subject).toContainReact(<h1>Some Title</h1>)
The Pain Points
The first approach is very tedious. The element, text, and props all require a separate test. Every time we change the implementation (what the component actually renders), we have to manually update the tests. This is especially painful when the arrangement of the rendered output changes.
The second approach is an improvement in that we can reduce the number of tests. However, we still have to manually tweak the tests when the rendered output changes. The failed test messages are also painful to interpret:
The pain points of both approaches multiply as the need to cover dynamic rendering increases.
Testing With Jest Snapshot Testing
We effectively test our rendered output in a much more efficient way than the alternative methods using snapshot testing.
Let’s Get Visual

Imagine we wanted to “test” the elements in this picture. We could assert the following:
- Contains wood background
- Contains mat on top of the wood background
- Contains leaves on top of the mat
- Contains three apples on top of the leaves
We could get more descriptive but you get the point…
Now, imagine the “output” of the picture changes:

Imagine we changed the “state” of this picture. We would have to include these additional assertions:
- Contains wood background
- Contains mat on top of the wood background
- Contains leaves on top of the mat
- Contains one apple on top of the leaves
Notice the verbosity of the assertions as well as the duplication when testing the dynamic case.
Basic Examples
Let’s test a very simple Title again but this time with snapshots:
// implementation
const Title = ({ children }) => <h1>{children}</h1>

// tests
import React from 'react'
import renderer from 'react-test-renderer'

import Title from './Title'

it('matches the saved snapshot', () => {
  const actualSnapshot = renderer
    .create(<Title>Some Title</Title>)
    .toJSON()

  expect(actualSnapshot).toMatchSnapshot()
})
Using react-test-renderer(), we take the rendered output of our React component and translate it to JSON:
console.log(actualSnapshot);

// console
`
  <h1>
    Some Title
  </h1>
`
When the Jest test runner spots the toMatchSnapshot of a test for the first time, it will generate a snapshot artifact (.snap) in a __snapshots__ directory relative to the component:
// __snapshots__/Title.spec.jsx.snap

exports[`macthes the saved snapshot 1`] = `
  <h1>
    Some Title
  </h1>
`
Later on, if the rendered output of the implementation changes, the Jest test runner will highlight the difference and prompt you to update the failing snapshot which can be updated by pressing u:
The Advantages
- Testing the rendered output of a component can be consolidated into a single test
- The difference between the new snapshot versus the old snapshot is easy to read and interpret
- You do not have to manually update any tests when the rendered output changes, the Jest test runner takes care of that for you
Setting Boundaries
renderer from react-test-renderer renders “down” to the elements in the DOM.
Of course, in many cases, there is a hierarchy in our rendered output.
Suppose we had the following hierarchy:
// FancyTitle
  // img
  // Title
    // h1

const FancyTitle = ({ children }) => (
  <div>
    <img src="/logo" />
    <Title>{children}</Title>
  </div>
)
Our snapshot would render down to the h1:
exports[`macthes the saved snapshot 1`] = `
  <div>
    <img src="/logo.svg" />
    <h1>
      Some Title
    </h1>
  </div>
`
Shallow and Mount Rendering
By the way, this is the difference between the shallow and mount rendering of Enzyme.
“Mount” rendering goes all the way down the hierarchy until it reaches the end of the tree, the DOM elements.
“Shallow” rendering merely goes to the immediate node of the tree, the rendered output as you see it in the React component.
The Default Behavior of Snapshots
By default, the snapshots reflect the “mount” rendered output by default, not the “shallow” rendered output.
Capturing the Shallow Output in Snapshots
You may prefer the default “mount” approach for testing, that’s cool.
However, shallow has the advantage of setting the boundary of your snapshots to reflect the implementation.
In other words, if we capture the shallow output in our snapshots, the snapshots will directly match what we see being rendered in the React component:
const FancyTitle = ({ children }) => (
  <div>
    <img src="/logo" />
    <Title>{children}</Title>
  </div>
)

// tests
jest.mock('./Title', () => 'Title') // set boundary

it('matches the saved snapshot', () => {
  const actualSnapshot = renderer
    .create(<FancyTitle>Some Title</FancyTitle>)
    .toJSON()
  expect(actualSnapshot).toMatchSnapshot()
})

// snapshot
exports[`macthes the saved snapshot 1`] = `
  <div>
    <img src="/logo.svg" />
    <Title>
      Some Title
    </Title>
  </div>
`

// not
exports[`macthes the saved snapshot 1`] = `
  <div>
    <img src="/logo.svg" />
    <h1>
      Some Title
    </h1>
  </div>
`
In our example, the snapshot for FancyTitle does not go further down to capture the rendered output of Title. Rather, it captures that it renders Title. The snapshot test for Title can capture that it renders h1.
This is achieved by the following syntactic sugar:
jest.mock('./Title', () => 'Title')
This effectively sets the boundary of our snapshot tests to not go past Title.
For external and named modules, we do the following:
// external module
jest.mock('react-bootstrap', () => ({
  Title: 'Title'
}))

// named module
jest.mock('./Title', () => ({
  Title: 'Title'
}))
This has the advantage of setting the boundary of your snapshot tests, testing a component as a unit. Again, the snapshot reflects the rendered output as you see in the implementation of the component.
In my humble opinion, this makes writing and reviewing snapshot tests much easier.
Combining With Enzyme
It makes sense that we would want to continue to use Enzyme to traverse through the rendered output to fire events as the “action”; capture a snapshot of a portion of the rendered output; test various pass-through props independent of snapshot tests; etc.
However, the renderer instance expects a React element, not an Enzyme wrapper. How do we get around this?
No problem! We can just use the getElement method on an Enzyme wrapper once we are ready to generate the snapshot in a test:
// implementation
const Title = ({ children }) => {
  const [isHighlighted, setIsHighlighted] = useState(false)

  const handleClick = () => {
    setIsHighlighted(true)
  }

  const style = { color: isHighlighted ? 'red' : 'black' }

  return <h1 onClick={handleClick} style={style}>{children}</h1>
}

// tests
it('matches the saved snapshot when clicked', () => {
  const subject = shallow(
    <Title>Some Title</Title>
  )

  subject.props().onClick()

  const actualSnapshot = renderer
    .create(subject.getElement()) // translate back to element
    .toJSON()

  expect(actualSnapshot).toMatchSnapshot()
})
Even better, we can make a simple renderSnapshot util that will do this for us:
import renderer from 'react-test-renderer'
export default (elem) => renderer.create(elem.getElement()).toJSON()
// updated test example
it('matches the saved snapshot when clicked', () => {
  const subject = shallow(
    <Title>Some Title</Title>
  )

  subject.props().onClick()

  expect(renderSnapshot(subject)).toMatchSnapshot()
})
Handling Dynamic Rendering
Basic examples are easy but what about when the rendered output is dynamic (based on incoming props or state changes).
Dynamic Rendering Given Various Props
Here’s a component that renders a different output based on an incoming isLoading prop:
const Title = ({ children, isLoading }) => (
<h1>{isLoading ? 'Loading...' : children}</h1>
)
We can organize our test file to include a snapshot for the default (is not loading) case and the is loading case:
it('matches the saved snapshot', () => {
  const subject = shallow(
    <Title isLoading={false}>Some Title</Title>
  )

  expect(renderSnapshot(subject)).toMatchSnapshot()
})

describe('is loading', () => {
  it('matches the saved snapshot', () => {
    const subject = shallow(
      <Title isLoading>Some Title</Title>
    )

    expect(renderSnapshot(subject)).toMatchSnapshot()
  })
})
Even better, I like to use a renderComponent helper function which generates the “default” case by default but allows to get into “special” cases by overriding provided props:
it('matches the saved snapshot', () => {
  const subject = renderComponent()

  expect(renderSnapshot(subject)).toMatchSnapshot()
})
describe('is loading', () => {
  it('matches the saved snapshot', () => {
    const subject = renderComponent({ isLoading: true })
   expect(renderSnapshot(subject)).toMatchSnapshot()
  })
})
const renderComponent = (props) => (
  shallow(
    <Title isLoading={false} {...props}>Some Title</Title>
  )
)
Dynamic Rendering Given State Changes
Similarly, we can render different snapshots when the state changes. This looks pretty much the same as the last example, we just add the “action” in the test to get into our special case:
// implementation
const Title = ({ children }) => {
  const [isHighlighted, setIsHighlighted] = useState(false)

  const handleClick = () => {
    setIsHighlighted(true)
  }

  const style = { color: isHighlighted ? 'red' : 'black' };

  return <h1 onClick={handleClick} style={style}>{children}</h1>
}

it('matches the saved snapshot', () => {
  const subject = renderComponent()

  expect(renderSnapshot(subject)).toMatchSnapshot()
})

// tests
it('matches the saved snapshot', () => {
  const subject = renderComponent()

  expect(renderSnapshot(subject)).toMatchSnapshot()
})

describe('is highlighted', () => {
  const subject = renderComponent();

  subject.props().onClick()

  expect(renderSnapshot(subject)).toMatchSnapshot()
})

const renderComponent = (props) => (
  shallow(
    <Title {...props}>Some Title</Title>
  )
)
Covering Pass-Through Props
There are a couple of considerations for covering pass-through props in snapshot tests.
Capturing Arbitrary Props
It is common for components to pass through arbitrary props using the spread operator:
const Title = ({ children, ...rest }) => (
  <h1 {...rest}>{children}</h1>
)
To capture this in a snapshot test, make sure to include an arbitrary prop in the renderComponent setup:
const renderComponent = (props) => (
  shallow(
    <Title someArbitraryProp={123} {...props}>Some Title</Title>
  )
)
Handling Booleans
If you are explicitly passing through a boolean prop (not using ...rest), you will need an additional test:
const FancyTitle = ({ children, isLoading }) => (
  <Title isLoading={isLoading}>{children}</Title>
)
You could use the Enzyme API to achieve this as a one-off from the snapshot test:
jest.mock('./Title', () => 'Title')

it('matches the saved snapshot', () => {
  const subject = renderComponent()

  expect(renderSnapshot(subject)).toMatchSnapshot()
})

it('passes through "isLoading" prop', () => {
  const subject = renderComponent({ isLoading: false })

  expect(subject.props().isLoading).toBe(false)
})

const renderComponent = (props) => (
  shallow(
    <FancyTitle isLoading={false} {...props}>Some Title</FancyTitle>
  )
)
Or, you could do an additional snapshot:
jest.mock('./Title', () => 'Title')

it('matches the saved snapshot', () => {
  const subject = renderComponent()

  expect(renderSnapshot(subject)).toMatchSnapshot()
})

describe('is loading', () => {
  it('matches the saved snapshot', () => {
    const subject = renderComponent({ isLoading: true })

    expect(renderSnapshot(subject)).toMatchSnapshot()
  })
})

const renderComponent = (props) => (
  shallow(
    <FancyTitle isLoading={false} {...props}>Some Title</FancyTitle>
  )
)
Handling Functions
There’s a handy trick for capturing pass-through functions in your snapshot test:
// tests
it('matches the saved snapshot', () => {
  const subject = renderComponent()

  expect(renderSnapshot(subject)).toMatchSnapshot()
})

const renderComponent = (props) => (
  shallow(
    <Title
      onClick={jest.mockName('onClick')}
      {...props}
    >
      Some Title
    </Title>
  )
)

// snapshots
exports[`macthes the saved snapshot 1`] = `
  <Title onClick={[MockFunction onClick]}> // not just [Function]
    Some Title
  </Title>
`
If we didn’t add the jest.mockName('onClick'), we would not be able to look at the snapshot and no whether the onClick prop was a pass-through or an anonymous function.
Now, it is clear that the onClick prop that is passed through in the snapshot has the value of the incoming onClick prop.
Objections to Snapshot Testing
Snapshot testing seems great when looking at basic examples but what about using it in a codebase day to day?
Several critiques are often mentioned in regard to the usability of snapshot testing:
- Snapshots can be updated too easily
- Snapshots can have a lot of duplication
- Snapshots can be hard to read
- Snapshots can get very long
Snapshots Can Be Updated Too Easily
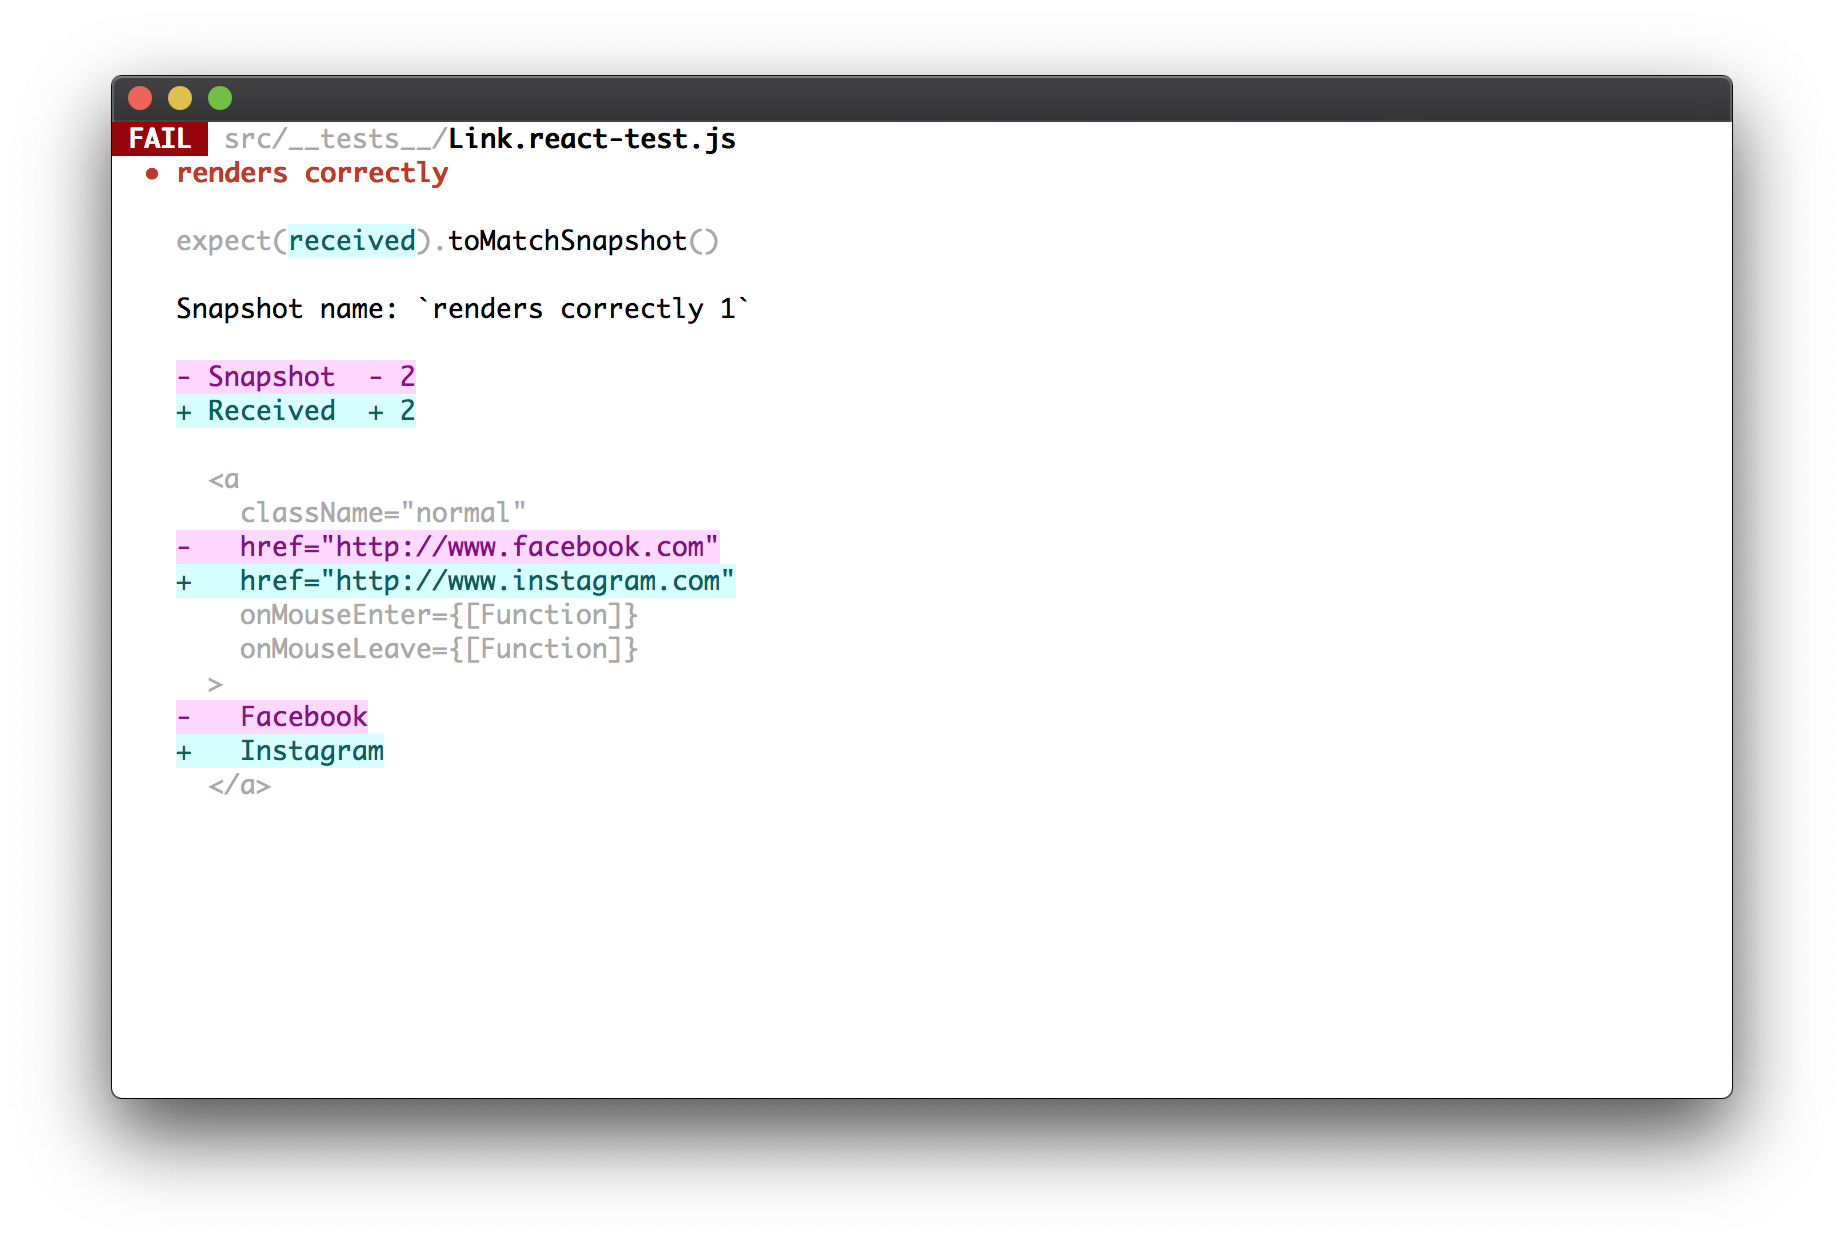
The Jest test runner makes updating snapshots a breeze. However, they are dangerously easy.
Let’s say I update a component that renders a link. I change the address of the link in one place:
I click u to update the tests and I know I’m good.
Easy enough.
But let’s say I made more than one simple change. I change four links in the rendered output to each point to four new links respectively. One of the links is incorrect, but I’m so used to hitting u to update my snapshots that it gets changed.
The efficiency of the test runner has only increased the risk of making unintentional changes, defeating the purpose.
My Response
This objection is coming from good instincts. However, it just means that a developer should be responsible for carefully reviewing changes that are being made to a component and its respective snapshot.
A developer should look at their diff in the implementation and double-check that the snapshot contains what is expected. Once this is confirmed, a reviewer can be tagged in a review. The reviewer will share the same responsibility.
In a word, the need for discipline and careful reviewing of tests based on changes to the implementation does not go away with snapshot testing. It just is a bit of a paradigm shift to look at snapshot files as the source of truth as to whether a component is sufficiently tested. In my opinion, it is more of an adjustment than an objection.
To be fair, it does require some of the other objections to be cleared up for this to be plainer.
Snapshot Testing Can Have A Lot of Duplication
It has already been mentioned that snapshot tests do not cover the business logic of components. This would need to be plainly taught and stressed on a team of developers.
Admittingly, there is some gray area.
It is common to have a component to have a foundational rendered output but with small tweaks based on certain conditions.
For example:
const Title = ({ children, isLoading }) => (
  <h1>{children}</h1>
  {isLoading && <Spinner />}
)
Whether isLoading is true or false, <h1>{children}</h1> will always be rendered. In this sense, it is foundational.
<Spinner /> on the other hand, only renders when isLoading is true.
I could have two snapshot tests:
- When
isLoadingis false (default) - When
isLoadingis true
The first snapshot would have the title but no spinner.
The second snapshot would have both the title and the spinner.
If I change the title to have a style:
const Title = ({ children, isLoading }) => (
  <h1 style={{ color: 'blue' }}>{children}</h1>
  {isLoading && <Spinner />}
)
Then, I would have two snapshots that would need to be updated when I’ve only made one change.
With more complex components, which is common, one simple change can cause N amount of snapshots to fail.
This can not be the most pleasant experience. It ties in with the next objection.
Snapshots Can Be Hard to Read
When there is a lot of duplication between snapshots, it can be hard to look at the snapshot file on its own and determine what is different between the “default” snapshot and the “special case” snapshot (i.e. default vs. loading).
The Solution
I think there are two possible solutions.
- Be explicit in the test name of the special cases to call out what is different.
exports[`macthes the saved snapshot 1`] = `
  <h1>
    Some Title
  </h1>
`
exports[`when loading also renders a spinner 1`] = `
  <h1>
    Some Title
    <Spinner />
  </h1>
`
The downside is that you have to keep the test names in sync with the rendered output which can be easily missed.
There’s a better solution though.
- Use snapshot-diff
With this snapshot utility, you would only store the snapshot diff between the default and special cases:
exports[`macthes the saved snapshot 1`] = `
  <h1>
    Some Title
  </h1>
`
exports[`when loading matches the saved snapshot 1`] = `
  + <Spinner />
`
Now, you can look at the default snapshot and easily (and only) see what has changed with the special case. In the example above, a spinner is when loading.
This also has the advantage of making our snapshot files smaller and allowing us to use generic snapshot test names.
Snapshots Can Get Very Long
snapshot-diff does help a lot with this problem. However, there is an even more basic solution.
The Solution
If the snapshot is getting too long, it’s probably time to refactor. If you look at snapshot testing as a means to encourage refactoring rather than producing a mess, then you will naturally see this potential objection as a benefit.
Final Words
Much more could be said, but at the end of the day, snapshot testing makes development much more efficient than a potential alternative. With any technology, it is not fool-proof and requires some pondering over best practices. Hopefully, this article helps you in that direction.
That’s all folks. Pow, discuss, and share!
s/en/snapshot-testing">Jest snapshot testing is primarily used for testing the rendered output of React components.The rendered output is ultimately the element(s) that render in the DOM:
For example, here’s a standard React component that renders a title:
const Title = ({ children }) => <h1>{children}</h1>
Title renders a simple h1 element. A snapshot test would ensure that this component output an h1 given the children input.
The aim is that if we test the rendered output of all our React components in an application, we will have effectively tested what is being shown to a user.
Dynamic Rendered Output
Of course, React is dynamic.
The rendered output can vary based on the input (props):
const Title = ({ children, className }) => (
  <h1 className={className}>{children}</h1>
)
It can also vary based on a component’s state:
const FancyTitle = ({ children }) => {
  const [isHighlighted, setIsHighlighted] = useState(false)

  const handleClick = () => {
    setIsHighlighted(true)
  }

  const style = { color: isHighlighted ? 'red' : 'black' }

  return <h1 onClick={handleClick} style={style}>{children}</h1>
}
When testing the rendered output, we want to make sure we cover all the dynamic outputs.
What Does It Not Test?
Snapshot tests do not cover the business logic of components.
For example, consider the following component:
const ClearStorageButton = ({ children }) => {
  const handleClick = () => {
    window.localStorage.clear()
  }

  return <button onClick={handleClick}>{children}</button>
}
Snapshot tests can ensure that the button is rendered, but they do not cover that when the onClick prop will effectively clear localStorage.
How Did We Test This?
Before diving into snapshot testing, let’s talk about the former alternative.
#1 Plain Enzyme and Jest Matchers
Using Enzyme and Jest, we can “wrap” our component in order to traverse the rendered output and assert that the output is what we expect.
// implementation
const Title = ({ children }) => <h1>{children}</h1>

// test
const subject = shallow(<Title>Some Title</Title>)

expect(subject).toContainReact(<h1>Some Title</h1>)
#2 Custom Enzyme Matchers for Jest
jest-enzyme is a package that provides custom matchers that make testing the rendered output easier:
// implementation
const Title = ({ children }) => <h1>{children}</h1>

// test
const subject = shallow(<Title>Some Title</Title>)

expect(subject).toContainReact(<h1>Some Title</h1>)
The Pain Points
The first approach is very tedious. The element, text, and props all require a separate test. Every time we change the implementation (what the component actually renders), we have to manually update the tests. This is especially painful when the arrangement of the rendered output changes.
The second approach is an improvement in that we can reduce the number of tests. However, we still have to manually tweak the tests when the rendered output changes. The failed test messages are also painful to interpret:
The pain points of both approaches multiply as the need to cover dynamic rendering increases.
Testing With Jest Snapshot Testing
We effectively test our rendered output in a much more efficient way than the alternative methods using snapshot testing.
Let’s Get Visual
Imagine we wanted to “test” the elements in this picture. We could assert the following:
- Contains wood background
- Contains mat on top of the wood background
- Contains leaves on top of the mat
- Contains three apples on top of the leaves
We could get more descriptive but you get the point…
Now, imagine the “output” of the picture changes:
Imagine we changed the “state” of this picture. We would have to include these additional assertions:
- Contains wood background
- Contains mat on top of the wood background
- Contains leaves on top of the mat
- Contains one apple on top of the leaves
Notice the verbosity of the assertions as well as the duplication when testing the dynamic case.
Basic Examples
Let’s test a very simple Title again but this time with snapshots:
// implementation
const Title = ({ children }) => <h1>{children}</h1>

// tests
import React from 'react'
import renderer from 'react-test-renderer'

import Title from './Title'

it('matches the saved snapshot', () => {
  const actualSnapshot = renderer
    .create(<Title>Some Title</Title>)
    .toJSON()

  expect(actualSnapshot).toMatchSnapshot()
})
Using react-test-renderer(), we take the rendered output of our React component and translate it to JSON:
console.log(actualSnapshot);
// console
`
<h1>
  Some Title
</h1>
`
When the Jest test runner spots the toMatchSnapshot of a test for the first time, it will generate a snapshot artifact (.snap) in a __snapshots__ directory relative to the component:
// __snapshots__/Title.spec.jsx.snap

exports[`macthes the saved snapshot 1`] = `
<h1>
  Some Title
</h1>
`
Later on, if the rendered output of the implementation changes, the Jest test runner will highlight the difference and prompt you to update the failing snapshot which can be updated by pressing u:
The Advantages
- Testing the rendered output of a component can be consolidated into a single test
- The difference between the new snapshot versus the old snapshot is easy to read and interpret
- You do not have to manually update any tests when the rendered output changes, the Jest test runner takes care of that for you
Setting Boundaries
renderer from react-test-renderer renders “down” to the elements in the DOM.
Of course, in many cases, there is a hierarchy in our rendered output.
Suppose we had the following hierarchy:
// FancyTitle
  // img
  // Title
    // h1

const FancyTitle = ({ children }) => (
  <div>
    <img src="/logo" />
    <Title>{children}</Title>
  </div>
)
Our snapshot would render down to the h1:
exports[`macthes the saved snapshot 1`] = `
<div>
  <img src="/logo.svg" />
  <h1>
    Some Title
  </h1>
</div>
`
Shallow and Mount Rendering
By the way, this is the difference between the shallow and mount rendering of Enzyme.
“Mount” rendering goes all the way down the hierarchy until it reaches the end of the tree, the DOM elements.
“Shallow” rendering merely goes to the immediate node of the tree, the rendered output as you see it in the React component.
The Default Behavior of Snapshots
By default, the snapshots reflect the “mount” rendered output by default, not the “shallow” rendered output.
Capturing the Shallow Output in Snapshots
You may prefer the default “mount” approach for testing, that’s cool.
However, shallow has the advantage of setting the boundary of your snapshots to reflect the implementation.
In other words, if we capture the shallow output in our snapshots, the snapshots will directly match what we see being rendered in the React component:
const FancyTitle = ({ children }) => (
  <div>
    <img src="/logo" />
    <Title>{children}</Title>
  </div>
)

// tests
jest.mock('./Title', () => 'Title') // set boundary

it('matches the saved snapshot', () => {
  const actualSnapshot = renderer
    .create(<FancyTitle>Some Title</FancyTitle>)
    .toJSON()
  expect(actualSnapshot).toMatchSnapshot()
})

// snapshot
exports[`macthes the saved snapshot 1`] = `
<div>
  <img src="/logo.svg" />
  <Title>
    Some Title
  </Title>
</div>
`

// not
exports[`macthes the saved snapshot 1`] = `
<div>
  <img src="/logo.svg" />
  <h1>
    Some Title
  </h1>
</div>
`
In our example, the snapshot for FancyTitle does not go further down to capture the rendered output of Title. Rather, it captures that it renders Title. The snapshot test for Title can capture that it renders h1.
This is achieved by the following syntactic sugar:
jest.mock('./Title', () => 'Title')
This effectively sets the boundary of our snapshot tests to not go past Title.
For external and named modules, we do the following:
// external module
jest.mock('react-bootstrap', () => ({
  Title: 'Title'
}))

// named module
jest.mock('./Title', () => ({
  Title: 'Title'
}))
This has the advantage of setting the boundary of your snapshot tests, testing a component as a unit. Again, the snapshot reflects the rendered output as you see in the implementation of the component.
In my humble opinion, this makes writing and reviewing snapshot tests much easier.
Combining With Enzyme
It makes sense that we would want to continue to use Enzyme to traverse through the rendered output to fire events as the “action”; capture a snapshot of a portion of the rendered output; test various pass-through props independent of snapshot tests; etc.
However, the renderer instance expects a React element, not an Enzyme wrapper. How do we get around this?
No problem! We can just use the getElement method on an Enzyme wrapper once we are ready to generate the snapshot in a test:
// implementation
const Title = ({ children }) => {
  const [isHighlighted, setIsHighlighted] = useState(false)

  const handleClick = () => {
    setIsHighlighted(true)
  }

  const style = { color: isHighlighted ? 'red' : 'black' }

  return <h1 onClick={handleClick} style={style}>{children}</h1>
}

// tests
it('matches the saved snapshot when clicked', () => {
  const subject = shallow(
    <Title>Some Title</Title>
  )

  subject.props().onClick()

  const actualSnapshot = renderer
    .create(subject.getElement()) // translate back to element
    .toJSON()

  expect(actualSnapshot).toMatchSnapshot()
})
Even better, we can make a simple renderSnapshot util that will do this for us:
import renderer from 'react-test-renderer'
export default (elem) => renderer.create(elem.getElement()).toJSON()
// updated test example
it('matches the saved snapshot when clicked', () => {
  const subject = shallow(
    <Title>Some Title</Title>
  )

  subject.props().onClick()

  expect(renderSnapshot(subject)).toMatchSnapshot()
})
Handling Dynamic Rendering
Basic examples are easy but what about when the rendered output is dynamic (based on incoming props or state changes).
Dynamic Rendering Given Various Props
Here’s a component that renders a different output based on an incoming isLoading prop:
const Title = ({ children, isLoading }) => (
  <h1>{isLoading ? 'Loading...' : children}</h1>
)
We can organize our test file to include a snapshot for the default (is not loading) case and the is loading case:
it('matches the saved snapshot', () => {
  const subject = shallow(
    <Title isLoading={false}>Some Title</Title>
  )

  expect(renderSnapshot(subject)).toMatchSnapshot()
})

describe('is loading', () => {
  it('matches the saved snapshot', () => {
    const subject = shallow(
      <Title isLoading>Some Title</Title>
    )

    expect(renderSnapshot(subject)).toMatchSnapshot()
  })
})
Even better, I like to use a renderComponent helper function which generates the “default” case by default but allows to get into “special” cases by overriding provided props:
it('matches the saved snapshot', () => {
  const subject = renderComponent()

  expect(renderSnapshot(subject)).toMatchSnapshot()
})
describe('is loading', () => {
  it('matches the saved snapshot', () => {
    const subject = renderComponent({ isLoading: true })
   expect(renderSnapshot(subject)).toMatchSnapshot()
  })
})
const renderComponent = (props) => (
  shallow(
    <Title isLoading={false} {...props}>Some Title</Title>
  )
)
Dynamic Rendering Given State Changes
Similarly, we can render different snapshots when the state changes. This looks pretty much the same as the last example, we just add the “action” in the test to get into our special case:
// implementation
const Title = ({ children }) => {
  const [isHighlighted, setIsHighlighted] = useState(false)

  const handleClick = () => {
    setIsHighlighted(true)
  }

  const style = { color: isHighlighted ? 'red' : 'black' };

  return <h1 onClick={handleClick} style={style}>{children}</h1>
}

it('matches the saved snapshot', () => {
  const subject = renderComponent()

  expect(renderSnapshot(subject)).toMatchSnapshot()
})

// tests
it('matches the saved snapshot', () => {
  const subject = renderComponent()

  expect(renderSnapshot(subject)).toMatchSnapshot()
})

describe('is highlighted', () => {
  const subject = renderComponent();

  subject.props().onClick()

  expect(renderSnapshot(subject)).toMatchSnapshot()
})

const renderComponent = (props) => (
  shallow(
    <Title {...props}>Some Title</Title>
  )
)
Covering Pass-Through Props
There are a couple of considerations for covering pass-through props in snapshot tests.
Capturing Arbitrary Props
It is common for components to pass through arbitrary props using the spread operator:
const Title = ({ children, ...rest }) => (
  <h1 {...rest}>{children}</h1>
)
To capture this in a snapshot test, make sure to include an arbitrary prop in the renderComponent setup:
const renderComponent = (props) => (
  shallow(
    <Title someArbitraryProp={123} {...props}>Some Title</Title>
  )
)
Handling Booleans
If you are explicitly passing through a boolean prop (not using ...rest), you will need an additional test:
const FancyTitle = ({ children, isLoading }) => (
  <Title isLoading={isLoading}>{children}</Title>
)
You could use the Enzyme API to achieve this as a one-off from the snapshot test:
jest.mock('./Title', () => 'Title')

it('matches the saved snapshot', () => {
  const subject = renderComponent()

  expect(renderSnapshot(subject)).toMatchSnapshot()
})

it('passes through "isLoading" prop', () => {
  const subject = renderComponent({ isLoading: false })

  expect(subject.props().isLoading).toBe(false)
})

const renderComponent = (props) => (
  shallow(
    <FancyTitle isLoading={false} {...props}>Some Title</FancyTitle>
  )
)
Or, you could do an additional snapshot:
jest.mock('./Title', () => 'Title')

it('matches the saved snapshot', () => {
  const subject = renderComponent()

  expect(renderSnapshot(subject)).toMatchSnapshot()
})

describe('is loading', () => {
  it('matches the saved snapshot', () => {
    const subject = renderComponent({ isLoading: true })

    expect(renderSnapshot(subject)).toMatchSnapshot()
  })
})

const renderComponent = (props) => (
  shallow(
    <FancyTitle isLoading={false} {...props}>Some Title</FancyTitle>
  )
)
Handling Functions
There’s a handy trick for capturing pass-through functions in your snapshot test:
// tests
it('matches the saved snapshot', () => {
  const subject = renderComponent()

  expect(renderSnapshot(subject)).toMatchSnapshot()
})

const renderComponent = (props) => (
  shallow(
    <Title
      onClick={jest.mockName('onClick')}
      {...props}
    >
      Some Title
    </Title>
  )
)

// snapshots
exports[`macthes the saved snapshot 1`] = `
<Title onClick={[MockFunction onClick]}> // not just [Function]
  Some Title
</Title>
`
If we didn’t add the jest.mockName('onClick'), we would not be able to look at the snapshot and no whether the onClick prop was a pass-through or an anonymous function.
Now, it is clear that the onClick prop that is passed through in the snapshot has the value of the incoming onClick prop.
Objections to Snapshot Testing
Snapshot testing seems great when looking at basic examples but what about using it in a codebase day to day?
Several critiques are often mentioned in regard to the usability of snapshot testing:
- Snapshots can be updated too easily
- Snapshots can have a lot of duplication
- Snapshots can be hard to read
- Snapshots can get very long
Snapshots Can Be Updated Too Easily
The Jest test runner makes updating snapshots a breeze. However, they are dangerously easy.
Let’s say I update a component that renders a link. I change the address of the link in one place:
I click u to update the tests and I know I’m good.
Easy enough.
But let’s say I made more than one simple change. I change four links in the rendered output to each point to four new links respectively. One of the links is incorrect, but I’m so used to hitting u to update my snapshots that it gets changed.
The efficiency of the test runner has only increased the risk of making unintentional changes, defeating the purpose.
My Response
This objection is coming from good instincts. However, it just means that a developer should be responsible for carefully reviewing changes that are being made to a component and its respective snapshot.
A developer should look at their diff in the implementation and double-check that the snapshot contains what is expected. Once this is confirmed, a reviewer can be tagged in a review. The reviewer will share the same responsibility.
In a word, the need for discipline and careful reviewing of tests based on changes to the implementation does not go away with snapshot testing. It just is a bit of a paradigm shift to look at snapshot files as the source of truth as to whether a component is sufficiently tested. In my opinion, it is more of an adjustment than an objection.
To be fair, it does require some of the other objections to be cleared up for this to be plainer.
Snapshot Testing Can Have A Lot of Duplication
It has already been mentioned that snapshot tests do not cover the business logic of components. This would need to be plainly taught and stressed on a team of developers.
Admittingly, there is some gray area.
It is common to have a component to have a foundational rendered output but with small tweaks based on certain conditions.
For example:
const Title = ({ children, isLoading }) => (
  <h1>{children}</h1>
  {isLoading && <Spinner />}
)
Whether isLoading is true or false, <h1>{children}</h1> will always be rendered. In this sense, it is foundational.
<Spinner /> on the other hand, only renders when isLoading is true.
I could have two snapshot tests:
- When
isLoadingis false (default) - When
isLoadingis true
The first snapshot would have the title but no spinner.
The second snapshot would have both the title and the spinner.
If I change the title to have a style:
const Title = ({ children, isLoading }) => (
  <h1 style={{ color: 'blue' }}>{children}</h1>
  {isLoading && <Spinner />}
)
Then, I would have two snapshots that would need to be updated when I’ve only made one change.
With more complex components, which is common, one simple change can cause N amount of snapshots to fail.
This can not be the most pleasant experience. It ties in with the next objection.
Snapshots Can Be Hard to Read
When there is a lot of duplication between snapshots, it can be hard to look at the snapshot file on its own and determine what is different between the “default” snapshot and the “special case” snapshot (i.e. default vs. loading).
The Solution
I think there are two possible solutions.
- Be explicit in the test name of the special cases to call out what is different.
exports[`macthes the saved snapshot 1`] = `
<h1>
  Some Title
</h1>
`
exports[`when loading also renders a spinner 1`] = `
<h1>
  Some Title
  <Spinner />
</h1>
`
The downside is that you have to keep the test names in sync with the rendered output which can be easily missed.
There’s a better solution though.
- Use snapshot-diff
With this snapshot utility, you would only store the snapshot diff between the default and special cases:
exports[`macthes the saved snapshot 1`] = `
<h1>
  Some Title
</h1>
`
exports[`when loading matches the saved snapshot 1`] = `
+ <Spinner />
`
Now, you can look at the default snapshot and easily (and only) see what has changed with the special case. In the example above, a spinner is when loading.
This also has the advantage of making our snapshot files smaller and allowing us to use generic snapshot test names.
Snapshots Can Get Very Long
snapshot-diff does help a lot with this problem. However, there is an even more basic solution.
The Solution
If the snapshot is getting too long, it’s probably time to refactor. If you look at snapshot testing as a means to encourage refactoring rather than producing a mess, then you will naturally see this potential objection as a benefit.
Final Words
Much more could be said, but at the end of the day, snapshot testing makes development much more efficient than a potential alternative. With any technology, it is not fool-proof and requires some pondering over best practices. Hopefully, this article helps you in that direction.
That’s all folks. Pow, discuss, and share!

